Zesty Pickled Banana Peppers: A Flavorful Journey into Pickling
Pickling is a time-honored preservation method that has been used across cultures for centuries. This culinary technique not only extends the shelf life of fruits and vegetables but also enhances their flavor profiles, creating a delightful balance of tartness and sweetness. Among the myriad of vegetables that lend themselves well to pickling, banana peppers stand out for their mild heat and vibrant flavor. This article will guide you through the process of making zesty pickled banana peppers, highlighting their culinary versatility and the joy of creating homemade pickles.
Understanding Banana Peppers
Banana peppers are a popular variety of sweet pepper, known for their elongated shape and bright yellow to green hue. When ripe, they can turn a deep orange or red, offering a visually appealing addition to any dish. The flavor of banana peppers is remarkably mild, with a subtle sweetness that makes them a favorite among both spice enthusiasts and those who prefer milder fare. They typically range from 0 to 500 Scoville heat units, making them a perfect choice for those who wish to add a hint of heat without overwhelming their palate.
Nutritionally, banana peppers are a treasure trove of benefits. They are low in calories and high in vitamins A and C, making them a great addition to a healthy diet. Packed with antioxidants, they also contribute to improved immune function and skin health. Beyond their health benefits, banana peppers have a versatile role in various cuisines, from being stuffed in sandwiches and salads to enhancing the flavor of pizzas and pasta dishes.
The process of pickling banana peppers not only preserves their freshness but also elevates their taste. The combination of vinegar, sugar, and spices transforms the peppers into a zesty condiment that can be used in a multitude of culinary applications. Whether you’re looking to spice up a salad, add zing to a sandwich, or serve as a tangy snack, zesty pickled banana peppers are sure to delight your taste buds.
Essential Ingredients for Zesty Pickled Banana Peppers
To embark on your pickling adventure, you’ll need a few essential ingredients. Each component plays a crucial role in achieving the perfect balance of flavors and ensuring the preservation of your banana peppers.
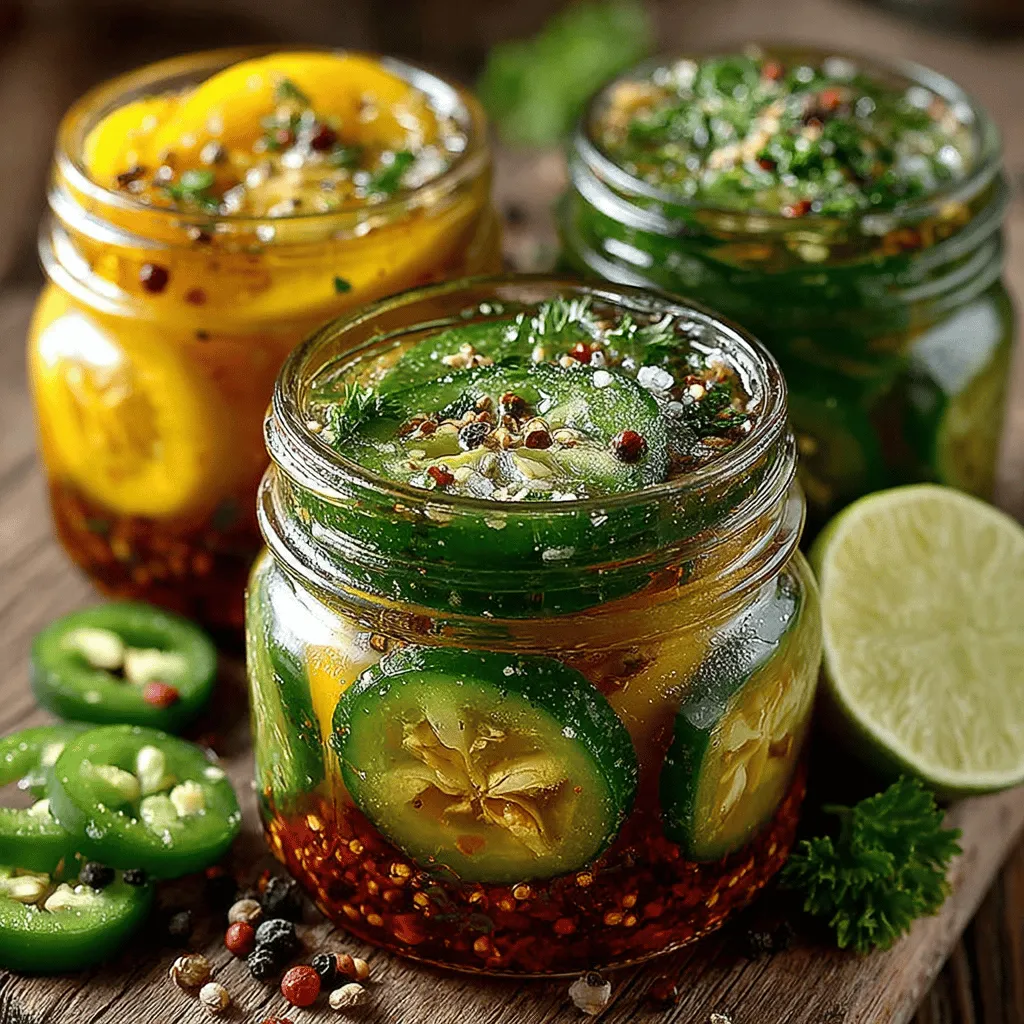
1. Banana Peppers: The star of the show, banana peppers should be firm and vibrant in color. Choose peppers that are free from blemishes or soft spots. For this recipe, you’ll need approximately 1 pound of banana peppers, which should yield about four pint-sized jars of pickles. Prepare them by washing, trimming the stems, and slicing them into rings or halves, depending on your preference.
2. White Vinegar: This ingredient is vital for the pickling process, providing the necessary acidity to preserve the peppers and add a sharp tang. Use distilled white vinegar with a 5% acidity level for consistent results. The acidity not only preserves the peppers but also helps to enhance their flavor profile, making them zesty and refreshing.
3. Sugar and Salt: Balancing flavors is key in any pickling recipe. Granulated sugar adds a hint of sweetness that complements the tangy vinegar, while salt is essential for flavor enhancement and acts as a preservative. For this recipe, you’ll typically use equal parts sugar and salt, adjusting to your taste preferences.
4. Spices and Herbs: A medley of spices and herbs will elevate the flavor of your pickled banana peppers. Common choices include black peppercorns for a mild heat, coriander seeds for a citrusy note, garlic for depth, oregano for an aromatic touch, and bay leaves for added complexity. These ingredients will infuse the brine with rich flavors, making each bite of your pickled peppers a delightful experience.
5. Optional Jalapeños: If you prefer a spicier kick, consider adding sliced jalapeños to the mix. They will not only enhance the heat but also add a layer of flavor complexity to your pickled banana peppers.
Step-by-Step Instructions for Pickling Banana Peppers
Before diving into the pickling process, it’s essential to prepare your canning jars properly. Sterilization is a crucial step in ensuring food safety, preventing any unwanted bacteria from spoiling your homemade pickles. Here’s a detailed guide on how to get started:
1. Preparation of Canning Jars: Begin by selecting appropriate jars for pickling. Pint-sized mason jars work well for storing banana peppers. Ensure you have new lids to create a proper seal. Wash the jars and lids in hot, soapy water, then rinse thoroughly.
2. Sterilization: To sterilize the jars, place them in a boiling water bath for 10 minutes. Alternatively, you can run them through a hot cycle in the dishwasher. This step is crucial to prevent spoilage and extend the shelf life of your pickled peppers.
3. Making the Brine: In a medium saucepan, combine equal parts of white vinegar and water (typically 1 cup of each) along with your sugar and salt. For a standard recipe, you might start with 1 cup of sugar and 1 tablespoon of salt, adjusting to taste. Heat the mixture over medium heat, stirring until the sugar and salt dissolve completely.
4. Adding Spices: Once the brine is heated, add in your chosen spices and herbs. This is where the flavors begin to meld together, so feel free to experiment with quantities to suit your palate. Bring the mixture to a gentle boil, allowing the spices to infuse the brine for a few minutes.
5. Packing the Jars: Carefully pack your sliced banana peppers into the sterilized jars, leaving about half an inch of headspace at the top. If you’re using jalapeños for added heat, layer them in with the banana peppers. It’s important to pack the jars tightly but not too tightly, as this will allow the brine to circulate and penetrate the peppers effectively.
6. Pouring the Brine: Once the jars are packed, ladle the hot brine over the peppers, ensuring they are fully submerged. Use a clean utensil to remove any air bubbles trapped in the jars, adding more brine if necessary to maintain the appropriate headspace.
7. Sealing and Storing: Wipe the rims of the jars with a clean cloth to ensure a proper seal, then place the sterilized lids on top and screw on the metal bands until they are fingertip-tight. This will create the necessary vacuum seal as the jars cool.
With your zesty pickled banana peppers packed and sealed, you’re well on your way to enjoying a tangy treat that can complement a wide variety of dishes. The next steps will involve cooling the jars and allowing the flavors to meld, but that’s a story for the next part of our culinary journey. Stay tuned as we explore the remaining steps to ensure your homemade pickles are nothing short of perfection.
Techniques for Efficiently Packing Banana Peppers and Optional Jalapeños
Packing your banana peppers and optional jalapeños efficiently is essential to create a visually appealing and flavorful jar of pickles. Start by washing your peppers thoroughly under cold running water. Remove the stems and slice them into rings or keep them whole depending on your preference. If you opt to include jalapeños for an extra kick, follow the same preparation steps.
When packing the jars, place the banana peppers upright if they are whole, or layer them in a way that they fit snugly without being overly compressed. This allows the brine to circulate freely and evenly. If you’re using sliced peppers, alternate layers of banana and jalapeño slices for a beautiful contrast of colors. Don’t forget to leave a bit of space between the peppers to allow for expansion during the pickling process.
Importance of Headspace in Jar Sealing
Headspace refers to the empty space at the top of the jar after filling it with ingredients and brine. This space is crucial for several reasons. First, it allows the brine to expand and contract during the canning process without causing the jar to break. Second, it ensures a proper seal, which is vital for preserving your peppers safely. Aim for about 1/2 inch of headspace for optimal results. If you overfill the jars, the brine may overflow during processing, leading to poor sealing and potential spoilage.
Filling the Jars with Brine
Once your peppers are packed in the jars, it’s time to fill them with brine. Ensure the brine has cooled slightly to prevent cooking the peppers, which can alter their texture. Using a ladle or a measuring cup, carefully pour the brine over the packed peppers, ensuring they are fully submerged. The brine should cover the peppers completely, as any exposed portions could spoil.
Tips for Ensuring Full Submersion of Peppers
To ensure that your banana peppers remain submerged, you can use a small, clean weight or a piece of crumpled parchment paper to press them down gently. This prevents the peppers from floating above the brine and is essential for proper fermentation and flavor absorption. If you notice that some peppers are still above the liquid after adding the brine, simply top off the jar with more brine until all peppers are fully covered.
Explanation of Headspace Importance for Preservation
Maintaining the correct headspace is not just about aesthetics; it directly impacts the preservation of your pickled peppers. Insufficient headspace can lead to the formation of air bubbles, which can create an environment conducive to spoilage. Conversely, too much headspace can lead to inadequate sealing, allowing contaminants to enter the jar. Proper headspace helps ensure that your pickles remain crispy, flavorful, and safe for consumption.
Sealing and Cooling the Jars
After filling your jars with brine, it’s time to seal them. Place the lids on each jar, ensuring they are aligned correctly and tightened to fingertip snugness. Avoid overtightening, as this can prevent the jars from sealing properly during the heating process. Following this, process the jars in a boiling water bath for about 10-15 minutes, depending on your altitude and jar size.
Once the processing time is complete, carefully remove the jars from the water bath and place them on a clean towel or cooling rack. Allow the jars to cool completely at room temperature, which can take several hours. This cooling period is crucial for creating a vacuum seal, which inhibits spoilage and ensures the longevity of your pickled banana peppers.
Steps for Properly Sealing Jars to Prevent Spoilage
1. Clean the Jar Edges: Before placing the lids, wipe the rim of each jar with a clean cloth to remove any residue that could prevent a proper seal.
2. Lid Placement: Center the lid on the jar and press down gently to ensure it is fitting correctly.
3. Secure the Band: Screw on the band until it is fingertip tight, ensuring that the lid is secure but not overly tightened.
4. Boiling Water Bath: Place the jars in a pot of boiling water, ensuring they are covered by at least an inch of water. This step is vital for sterilizing the jars and sealing the lids.
5. Cooling: Allow the jars to cool completely before storing them. You should hear a “pop” sound as the lids seal, indicating successful preservation.
Importance of Cooling Before Refrigeration
Cooling the jars before refrigerating them is essential for the pickling process. Rapid temperature changes can cause glass jars to crack or shatter. Furthermore, cooling allows the vacuum seal to form correctly, which helps keep your pickled peppers fresh for longer. Once the jars are completely cool, you can store them in the refrigerator or a cool, dark pantry.
The Pickling Process Explained
How Pickling Transforms Flavors Over Time
Pickling is not just a preservation method; it’s a transformative culinary process. The vinegar and salt in the brine interact with the peppers, drawing out moisture and infusing them with flavor. As the peppers soak, they absorb the tangy, zesty notes of the brine while their natural sweetness is enhanced and balanced.
Expected Timeline for Flavor Development; Why 24 Hours is Recommended
While you can technically consume your pickled banana peppers right after they cool, the flavors will continue to develop over time. It’s recommended to let them sit for at least 24 hours before tasting for the best flavor experience. This waiting period allows the spices to meld and the peppers to fully absorb the brine, resulting in a more complex and enjoyable taste.
Information on Storage and Shelf Life of Pickled Banana Peppers in the Fridge
Properly sealed and stored in the refrigerator, your zesty pickled banana peppers can last for up to three months. Ensure the jars are kept in a cool, dark place, away from direct sunlight. If you notice any signs of spoilage, such as off odors or mold, discard the peppers immediately.
Serving Suggestions and Culinary Uses
Zesty pickled banana peppers are not just a condiment; they can elevate a variety of dishes. Here are some creative ways to incorporate them into your meals:
– Topping for Sandwiches, Burgers, and Tacos: Add a tangy kick to your favorite sandwiches and burgers by layering on some pickled banana peppers. They also serve as a delicious topping for tacos, adding crunch and zest.
– Inclusion in Salads and Grain Bowls for Extra Zest: Toss your pickled peppers into salads or grain bowls for an unexpected burst of flavor. They pair beautifully with leafy greens, grains, and proteins.
– Use in Antipasto Platters and Charcuterie Boards: Include pickled banana peppers as part of an antipasto platter or charcuterie board. Their bright color and tangy flavor complement cured meats, cheeses, and olives beautifully.
– Pairing Suggestions with Different Foods and Beverages: Zesty pickled banana peppers work well with a variety of foods and beverages. Try pairing them with crisp white wines or light beers that can balance their acidity and spice.
The Benefits of Homemade Pickling
Making your own pickles offers numerous advantages over store-bought options. Here are a few benefits of homemade pickling:
– Control Over Ingredients and Flavor Profiles: When you pickle at home, you have full control over what goes into your brine. You can adjust the sweetness, acidity, and spice levels to suit your taste preferences.
– Satisfaction of Homemade Preservation: The process of pickling can be incredibly rewarding. There’s a unique satisfaction that comes from preserving your harvest and enjoying the fruits of your labor all year round.
– Economic Benefits of Pickling Seasonal Produce: Pickling allows you to take advantage of seasonal produce, preventing waste and saving money. Buy in bulk during peak season and transform excess vegetables into delicious condiments.
Conclusion
Creating zesty pickled banana peppers is not just about making a delicious condiment; it’s an experience that connects you to your food. The joy of watching the vibrant colors of the peppers transform into tangy bites of flavor is unmatched. As you experiment with different spices and types of peppers, you can personalize your pickling process to suit your unique palate.
Embrace the enduring popularity of pickled vegetables across culinary traditions and make this recipe your own. Whether as a topping, a side, or a standalone snack, zesty pickled banana peppers are sure to bring your meals to life. So gather your ingredients, follow the steps, and enjoy the delightful adventure of pickling!