Oreo Dreamland Cream Pie: A Heavenly Dessert Experience

WANT TO SAVE THIS RECIPE?

Introduction

Welcome to the delightful world of desserts, where sweetness reigns supreme and indulgence is always on the menu. Today, we are excited to introduce you to the Oreo Dreamland Cream Pie, a luscious dessert that promises to tantalize your taste buds and impress your guests. This no-bake pie features a rich and creamy filling nestled within a crunchy Oreo crust, making it a perfect choice for any occasion, whether it’s a birthday celebration, family gathering, or a simple treat for yourself.

What makes this dessert truly special is not just its taste, but also its ease of preparation. With a handful of ingredients and minimal effort, you can create a stunning dessert that looks and tastes as if it came straight from a gourmet bakery. As we explore the ins and outs of this dreamy cream pie, you’ll discover the essential ingredients, step-by-step instructions, and a bit of history that highlights why the Oreo Dreamland Cream Pie is a must-try for dessert enthusiasts.

Understanding the Classic Oreo Dreamland Cream Pie

The Origin of the Oreo Cookie

Before diving into the specifics of our Oreo Dreamland Cream Pie, it’s essential to understand the star of the show: the Oreo cookie. The Oreo has a rich history, dating back to its introduction by Nabisco in 1912. Initially, the cookie was marketed as “the Oreo Biscuit” and was a simple cream-filled chocolate wafer. Over the decades, the Oreo has transformed into a cultural icon, celebrating over 100 years of cookie love.

The unique combination of dark chocolate cookies and sweet cream filling has made Oreos incredibly popular across generations. Not only do they stand out as a perfect snack on their own, but they also boast impressive versatility in the dessert realm. From milkshakes to cheesecakes, the Oreo cookie has been creatively incorporated into countless recipes, but perhaps none are as beloved as the Oreo Dreamland Cream Pie.

What Makes a Dreamland Cream Pie?

So, what exactly is a Dreamland Cream Pie? At its core, a cream pie is a dessert with a creamy filling, often made from custard or whipped cream, set in a crust. Dreamland Cream Pies elevate this classic concept, emphasizing a light, airy texture and rich flavors that transport you to dessert heaven with every bite.

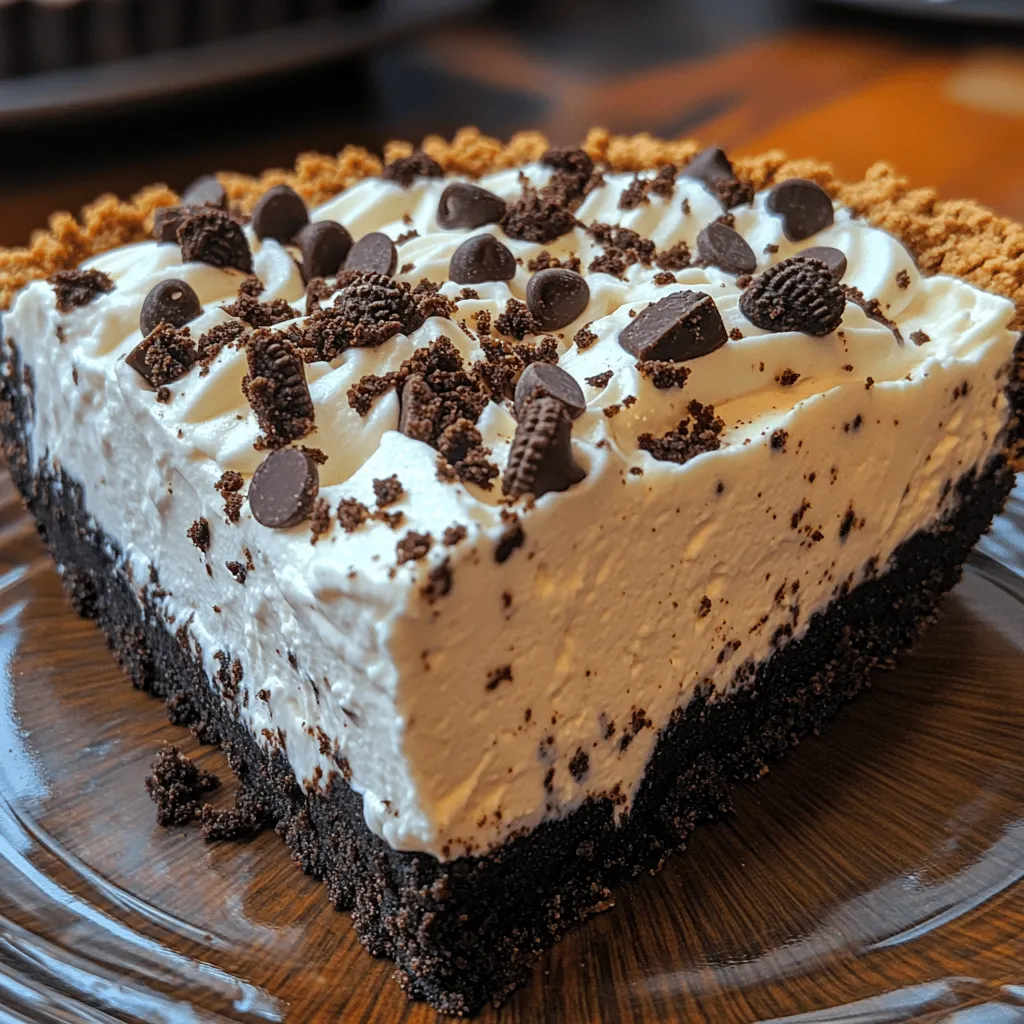
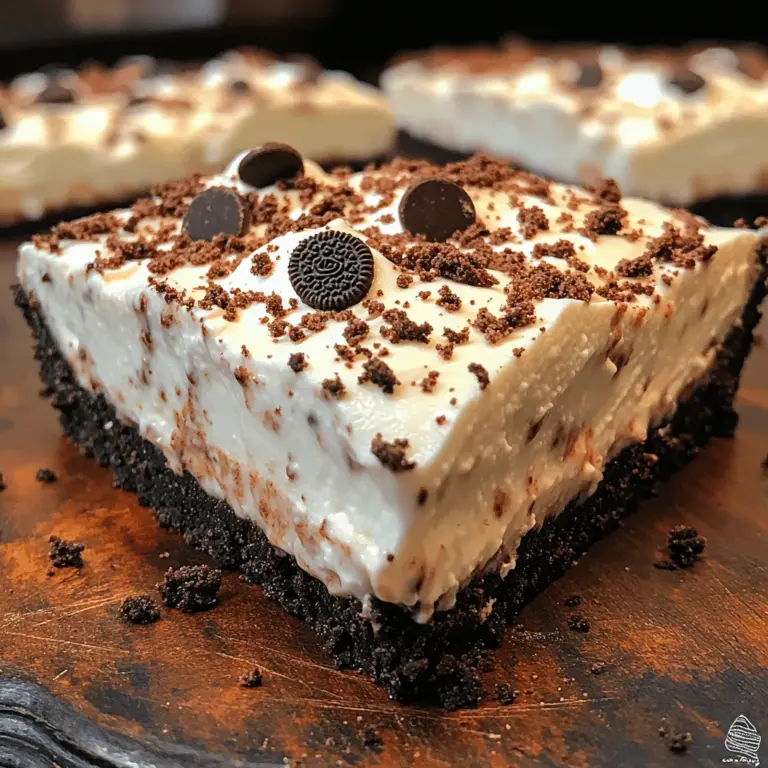
In the case of the Oreo Dreamland Cream Pie, the addition of crushed Oreo cookies to the crust and the filling creates an unforgettable flavor profile. The contrast between the crunchy cookie base and the smooth, velvety filling is what makes this pie a standout dessert. With each slice, you’ll experience the delightful harmony of chocolate and cream, making it a crowd-pleaser that leaves everyone coming back for seconds.

Ingredients Breakdown for the Perfect Oreo Dreamland Cream Pie

To create this delicious pie, you’ll need a selection of essential ingredients. It’s important to choose high-quality components to ensure that your final product is as tasty as possible.

Key Ingredients

1. Oreo Cookies: The foundation of both the crust and the filling, Oreos provide the essential chocolate flavor and texture.

2. Cream Cheese: This ingredient adds creaminess and a slight tang to the filling, balancing the sweetness of the other components.

3. Heavy Whipping Cream: A crucial element for achieving a light and airy filling, heavy whipping cream is whipped to perfection to give the pie its signature texture.

4. Powdered Sugar: Used to sweeten the filling and enhance its overall flavor, powdered sugar blends smoothly, ensuring a silky consistency.

5. Vanilla Extract: A splash of vanilla elevates the flavor profile, adding depth and warmth to the cream filling.

Selecting quality ingredients is vital for achieving the best flavor and texture in your pie. Opt for name-brand Oreos and high-fat cream cheese and whipping cream to ensure a rich and satisfying dessert.

Optional Additions for Extra Flavor

While the classic Oreo Dreamland Cream Pie is undoubtedly delicious on its own, there are a few optional additions that can take it to the next level:

Mini Chocolate Chips: Adding mini chocolate chips to the filling not only enhances the texture but also intensifies the chocolate flavor, creating a delightful surprise in each bite.

Flavored Cream Cheese: For a unique twist, consider using flavored cream cheese, such as chocolate or whipped cream varieties. This can add an unexpected flavor dimension to your pie.

Other Cookie Crusts: If you want to experiment, try using different cookie types for the crust, such as chocolate graham crackers or even vanilla wafers, for a unique take on this classic dessert.

Step-by-Step Guide to Making Oreo Dreamland Cream Pie

Now that you’re familiar with the background and ingredients, let’s dive into the step-by-step process of making your very own Oreo Dreamland Cream Pie. We’ll start with the crucial first step: preparing the Oreo crust.

Preparing the Oreo Crust

The crust is a vital component of the Oreo Dreamland Cream Pie, providing that essential crunch and flavor contrast to the creamy filling. Here’s how to prepare it perfectly:

1. Crush the Oreos:

– Start by taking about 24 Oreo cookies and placing them in a food processor. Pulse them until they are finely crushed. If you don’t have a food processor, you can place the cookies in a resealable plastic bag and crush them with a rolling pin or a heavy object until you achieve a fine crumb.

2. Mix with Butter:

– In a bowl, combine the crushed Oreos with 5 tablespoons of melted unsalted butter. The butter acts as a binding agent, allowing the cookie crumbs to hold together when pressed into the pie dish.

3. Achieve the Right Consistency:

– Stir the mixture until all the crumbs are evenly coated with butter. The texture should resemble damp sand, where the crumbs hold together when squeezed but are not overly wet.

4. Press into the Pie Dish:

– Transfer the Oreo mixture into a 9-inch pie dish. Using the back of a measuring cup or your fingers, firmly press the crumbs into the bottom and up the sides of the dish to form an even crust. Ensure there are no gaps or weak spots to prevent the filling from seeping through.

5. Chill the Crust:

– Once the crust is pressed into shape, place it in the refrigerator for at least 30 minutes to set. This chilling time helps the butter firm up, ensuring that your crust will slice neatly once the pie is assembled.

With the crust prepared, you’re well on your way to creating a stunning Oreo Dreamland Cream Pie. Stay tuned as we continue to build this delicious dessert by crafting the creamy filling and assembling the pie in the following sections. The combination of flavors and textures is sure to make this dessert a favorite in your household!

Welcome to the delightful world of desserts, where sweetness reigns supreme and indulgence is always on the menu. Today, we are excited to introduce you to the <strong>Oreo Dreamland Cream Pie</strong>, a luscious dessert that promises to tantalize your taste buds and impress your guests. This no-bake pie features a rich and creamy filling nestled within a crunchy Oreo crust, making it a perfect choice for any occasion, whether it’s a birthday celebration, family gathering, or a simple treat for yourself.” /></p>
</p>
<h3>Importance of Baking and Cooling the Crust for Pie Stability</h3>
</p>
<p>Creating a stable pie starts with a well-baked crust. The crust not only provides the foundational structure for your Oreo Dreamland Cream Pie but also contributes to the overall texture and flavor. When baking your crust, ensure that it reaches a golden-brown color, which indicates that it has fully cooked and will not become soggy once the creamy filling is added. After baking, allow the crust to cool completely; this step is crucial for preventing the filling from melting into a warm crust, which can lead to a messy pie and undermine its stability. A well-cooled crust helps maintain the pie’s shape and makes slicing much easier.</p>
</p>
<h3>Creating the Creamy Filling</h3>
</p>
<h4>Techniques for Softening Cream Cheese for a Smooth Mix</h4>
</p>
<p>For a smooth and creamy filling, start by softening your cream cheese. Remove the cream cheese from the refrigerator and let it sit at room temperature for about 30 minutes. If you’re short on time, you can cut the cream cheese into small cubes to speed up the softening process. Once softened, use an electric mixer on medium speed to beat the cream cheese until it is smooth and free of lumps. This step is essential, as any lumps in your filling will be noticeable in the final pie.</p>
</p>
<h4>Importance of Whipping Cream to Stiff Peaks for a Light Texture</h4>
</p>
<p>Next, whipping the cream is a pivotal step that contributes to the light and airy texture of your pie. To achieve stiff peaks, start with cold heavy cream. Pour the cream into a mixing bowl and beat it on medium-high speed. As you whip, the cream will gradually thicken. Watch closely, as it will begin to form soft peaks before reaching stiff peaks. This stage is achieved when the cream holds its shape and stands upright when the beaters are lifted. Incorporating whipped cream into the filling adds volume and a delightful lightness, making each bite of your pie melt in your mouth.</p>
</p>
<h4>How to Integrate Flavors Without Compromising the Structure</h4>
</p>
<p>To enhance the flavor of your cream pie without compromising its structure, gently fold the whipped cream into the cream cheese mixture. Start by adding a small portion of whipped cream to the cream cheese and stirring it in vigorously to loosen the mixture. This method helps to lighten the cream cheese. Then, carefully fold in the remaining whipped cream using a spatula, employing a gentle motion to avoid deflating the whipped cream. This technique preserves the airy texture while ensuring that the flavors meld beautifully. You can also add vanilla extract or a splash of milk for extra flavor, but be cautious not to add too much liquid, as this can affect the pie’s consistency.</p>
</p>
<h3>Assembling the Pie</h3>
</p>
<p>Once your crust has cooled and your creamy filling is ready, it’s time to assemble your Oreo Dreamland Cream Pie.</p>
</p>
<h4>Step-by-Step Assembly Process</h4>
</p>
<p>1. <strong>Prepare the Crust</strong>: Make sure your Oreo crust is completely cooled. If you’re using a store-bought crust, ensure it is thawed and ready.</p>
</p>
<p>2. <strong>Fill the Crust</strong>: Spoon the creamy filling into the cooled Oreo crust. Use a spatula to spread it evenly, making sure to fill every corner of the crust.</p>
</p>
<p>3. <strong>Smoothing the Filling for a Professional Finish</strong>: To achieve a polished look, use an offset spatula to smooth the top of the filling. Start from the center and work your way out to the edges, ensuring an even surface.</p>
</p>
<p>4. <strong>Chill the Pie</strong>: Cover the pie with plastic wrap or a lid and place it in the refrigerator for at least 4 hours, or ideally overnight. Chilling allows the filling to set properly, making it easier to slice and serve.</p>
</p>
<h3>Garnishing and Serving Suggestions</h3>
</p>
<h4>The Art of Garnishing</h4>
</p>
<p>Garnishing your pie is where you can unleash your creativity. Here are some ideas to elevate the presentation of your Oreo Dreamland Cream Pie:</p>
</p>
<p>– <strong>Crushed Oreos</strong>: Sprinkle crushed Oreos on top of the pie for added texture and a visual appeal. You can use a food processor to crush them finely or place them in a zip-top bag and crush them with a rolling pin.</p>
</p>
<p>– <strong>Whipped Cream</strong>: Pipe dollops of freshly whipped cream around the edges of the pie for a decorative touch. This not only enhances the visual appeal but also adds to the creamy texture.</p>
</p>
<p>– <strong>Chocolate Drizzle</strong>: A drizzle of melted chocolate or chocolate syrup can create an enticing look. Use a spoon or a squeeze bottle to create a beautiful pattern over the top.</p>
</p>
<p>– <strong>Fruits</strong>: If you want to add a fresh element, consider topping the pie with fresh berries, such as raspberries or strawberries, which contrast beautifully with the rich filling.</p>
</p>
<h4>Serving Ideas</h4>
</p>
<p>When it comes to serving your Oreo Dreamland Cream Pie, presentation is key. Here are some tips:</p>
</p>
<p>– <strong>Best Ways to Slice</strong>: To achieve clean slices, use a sharp knife dipped in warm water. Wipe the knife clean between cuts to maintain neat edges.</p>
</p>
<p>– <strong>Pairing Suggestions</strong>: This dessert pairs wonderfully with a variety of beverages. Consider serving it with a glass of cold milk, a rich coffee, or even a scoop of vanilla ice cream on the side. Each of these options complements the flavors of the pie, enhancing the overall experience.</p>
</p>
<h3>Nutritional Information and Serving Size</h3>
</p>
<p>Understanding the nutritional values of your dessert can help you enjoy it mindfully. Here is a general overview of the nutritional information per serving of Oreo Dreamland Cream Pie:</p>
</p>
<p>– <strong>Calories</strong>: Approximately 350-400 calories</p>
<p>– <strong>Protein</strong>: 4-5 grams</p>
<p>– <strong>Fat</strong>: 28-30 grams</p>
<p>– <strong>Carbohydrates</strong>: 30-35 grams</p>
<p>– <strong>Sugars</strong>: 20-25 grams</p>
</p>
<h4>Discussion on Portion Control and Indulgence</h4>
</p>
<p>While the Oreo Dreamland Cream Pie is certainly indulgent, portion control is essential to enjoy it guilt-free. Aim for small slices, especially if serving at a gathering. This allows guests to savor the flavors without overindulging. Enjoying dessert in moderation is a way to appreciate it fully, and sharing a pie with family or friends makes for a joyful experience.</p>
</p>
<h3>Conclusion</h3>
</p>
<p>In conclusion, the Oreo Dreamland Cream Pie is not just a dessert; it’s an experience that combines the beloved taste of Oreos with a rich, creamy filling. This recipe is perfect for all occasions, ensuring your guests will leave with satisfied sweet tooth cravings. With its straightforward preparation process and delightful flavor, this pie is destined to become a staple in your dessert repertoire. Enjoy crafting this delicious treat and share its joy with family and friends!</p>
</div>

Welcome to the delightful world of desserts, where sweetness reigns supreme and indulgence is always on the menu. Today, we are excited to introduce you to the Oreo Dreamland Cream Pie, a luscious dessert that promises to tantalize your taste buds and impress your guests. This no-bake pie features a rich and creamy filling nestled within a crunchy Oreo crust, making it a perfect choice for any occasion, whether it's a birthday celebration, family gathering, or a simple treat for yourself.

Oreo Cream Pie

Discover the Oreo Dreamland Cream Pie, a no-bake dessert that will elevate your gatherings and satisfy your sweet cravings. This delightful pie features a crunchy Oreo crust filled with a creamy, rich filling that's easy to make with simple ingredients. With its perfect blend of chocolate and cream, this dessert promises to impress everyone at your table. Ideal for any occasion, this pie is sure to become a cherished favorite. Enjoy making this heavenly treat and indulge in every delightful bite!

Ingredients
  

24 Oreo cookies (plus 4 for garnish)

1/4 cup unsalted butter, melted

2 cups heavy whipping cream

1/2 cup powdered sugar

1 teaspoon vanilla extract

8 oz cream cheese, softened

1 cup powdered sugar (additional)

1 teaspoon vanilla extract (additional)

1 cup mini chocolate chips (optional)

Instructions
 

Prepare the Crust:

    - Preheat your oven to 350°F (175°C).

      - In a food processor, crush 24 Oreo cookies until they resemble fine crumbs.

        - Combine the cookie crumbs with melted butter in a bowl and mix well.

          - Firmly press the mixture into the bottom and sides of a 9-inch pie pan to form the crust.

            - Bake for 10 minutes, then let it cool completely.

              Make the Cream Filling:

                - In a medium mixing bowl, beat the softened cream cheese using an electric mixer until smooth.

                  - Add 1 cup of powdered sugar and 1 teaspoon of vanilla extract to the cream cheese and mix until well combined.

                    Whip the Cream:

                      - In a separate bowl, whip the heavy cream, 1/2 cup of powdered sugar, and 1 teaspoon of vanilla until stiff peaks form.

                        - Gently fold half of the whipped cream into the cream cheese mixture until blended.

                          - Fold in the remaining whipped cream until fully incorporated. If desired, fold in mini chocolate chips for extra texture.

                            Assemble the Pie:

                              - Pour the creamy filling into the cooled Oreo crust. Smooth the top with a spatula.

                                - Place the pie in the refrigerator for at least 4 hours (or overnight) to allow it to set properly.

                                  Garnish and Serve:

                                    - Before serving, crush the remaining 4 Oreo cookies and sprinkle them on top of the pie for decoration.

                                      - Slice and serve chilled, and enjoy every delicious bite of your Oreo Dreamland Cream Pie!

                                        Prep Time, Total Time, Servings: 30 minutes | 4 hours (chill time) | 8 servings

                                          WANT TO SAVE THIS RECIPE?

                                          Leave a Comment

                                          Recipe Rating