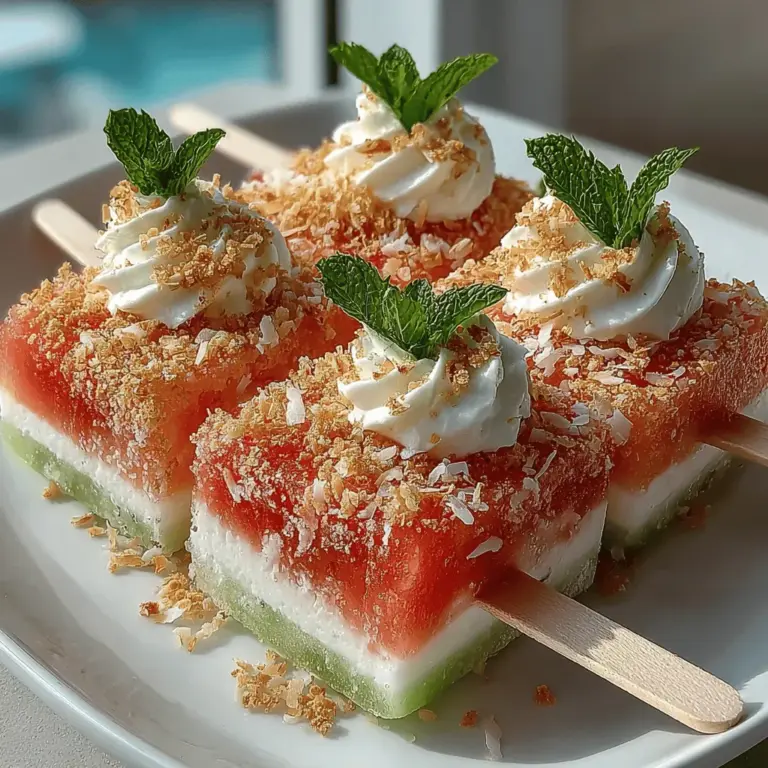
Crispy Watermelon Popsicles Recipe

WANT TO SAVE THIS RECIPE?

Introduction

As the sun blazes down and temperatures soar, there’s nothing quite like a refreshing treat to cool off. Among the myriad of summer delights, Crispy Watermelon Popsicles stand out as a vibrant and nutritious option. These popsicles are a harmonious blend of juicy watermelon, zesty lime, and rich yogurt, all enveloped in a delightful crispy coconut coating. They not only satisfy a sweet craving but also celebrate the wholesome goodness of fresh ingredients, making them a healthier alternative to the mass-produced frozen treats found in stores.

The inspiration behind these popsicles lies in the quest for a guilt-free indulgence that captures the essence of summer. Watermelon, often regarded as the quintessential summer fruit, is not just delicious; it’s also packed with hydration and essential vitamins. By adding a touch of lime and yogurt, these popsicles become a symphony of flavors that tantalize the taste buds while providing nutritional benefits.

In the following sections, we’ll delve into the details of creating these colorful popsicles, covering everything from the ingredients to the step-by-step preparation. You’ll learn about the health benefits of each component and discover tips for customizing your popsicles to suit your preferences.

Understanding the Ingredients

To create the perfect Crispy Watermelon Popsicles, let’s explore the core components that make this recipe not only delicious but also nutritious.

The Star Ingredient: Watermelon

Watermelon is the showstopper in this recipe. Known for its high water content, this fruit is incredibly hydrating, making it an ideal choice for hot summer days. Additionally, watermelon is rich in vitamins A and C, both of which are vital for maintaining healthy skin and immune function. The vibrant pink flesh of the watermelon not only looks appealing but also contains lycopene, an antioxidant linked to numerous health benefits.

While watermelon can be enjoyed year-round, it truly shines in the summer months when it’s at its peak ripeness. Choosing a ripe watermelon will ensure that your popsicles are bursting with flavor. Look for a watermelon that feels heavy for its size and has a uniform shape without any dents or bruises.

Sweeteners and Flavor Enhancers

To elevate the natural sweetness of watermelon, we’ll incorporate sweeteners and flavor enhancers. Natural sweeteners like honey or agave syrup can be used to adjust the sweetness to your liking. These sweeteners not only add flavor but also come with health benefits; honey, for example, is known for its antimicrobial properties and can soothe sore throats.

Lime juice is another essential ingredient in this recipe. It introduces a refreshing tang that balances the sweetness of the watermelon and adds an extra boost of vitamin C. The zesty flavor of lime complements the watermelon perfectly, creating a bright and invigorating taste.

For those looking to add a hint of freshness, mint leaves can be incorporated as an optional ingredient. Mint not only enhances the flavor profile but also adds a pleasant herbal note that elevates the overall experience of the popsicles.

Creamy Layer: Yogurt

Next, we have the creamy component—yogurt. This ingredient brings a velvety texture to the popsicles and adds a dose of probiotics, which are beneficial for gut health. You can choose between Greek yogurt or coconut yogurt, depending on your dietary preferences.

Greek yogurt is higher in protein and lower in sugar, making it a great option for those seeking a more substantial snack. On the other hand, coconut yogurt is a fantastic dairy-free alternative that offers a unique flavor profile and is suitable for vegans. Both options provide creaminess and a delightful contrast to the refreshing watermelon base.

Coconut Flakes: The Crispy Coating

Finally, no popsicle is complete without a crispy coating, and that’s where coconut flakes come into play. For this recipe, you can choose between unsweetened and sweetened coconut flakes, with unsweetened being the healthier option. Coconut is rich in healthy fats, fiber, and essential minerals, making it a nutritious addition to your popsicles.

The crispy texture of the coconut flakes adds a satisfying crunch that complements the creamy and juicy layers. When selecting coconut flakes, look for high-quality options that are free from additives and preservatives to keep your popsicles as wholesome as possible.

Step-by-Step Instructions

Now that we’ve covered the ingredients, let’s dive into the step-by-step process of making Crispy Watermelon Popsicles. Follow these detailed instructions to create your own delicious frozen treats at home.

Preparing the Watermelon Base

The first step in creating these popsicles is to prepare the watermelon base. Start by cutting the watermelon into manageable chunks, removing the seeds if necessary. For the best results, use a ripe watermelon to ensure maximum sweetness and flavor.

Next, blend the watermelon in a high-speed blender until it reaches a smooth consistency. If you prefer a thicker texture, blend it less; for a more liquid base, you can blend it longer. Once you achieve your desired consistency, pour the blended watermelon into a mixing bowl.

To enhance the flavor, it’s time to incorporate lime juice and your chosen sweetener. Start with the juice of one lime, adjusting to taste. If you’re using honey or agave syrup, start with a tablespoon and add more if needed. Mix well to combine all the ingredients, ensuring that the sweetness and tanginess are balanced.

Straining for Smoothness

To achieve a silky texture for your popsicles, straining the watermelon mixture is crucial. This step removes any pulp or seed remnants, resulting in a smoother popsicle. You can use a fine-mesh strainer or cheesecloth to strain the mixture.

Place the strainer over a bowl and pour the blended watermelon mixture into it. Use a spatula to press down and extract as much liquid as possible, discarding the pulp left behind. This process may take a few minutes, but it’s essential for achieving that perfect popsicle texture.

Filling the Molds

With the watermelon base ready, it’s time to fill your popsicle molds. If you don’t have popsicle molds, small paper cups or ice cube trays can also work as alternatives. Before pouring, make sure the molds are clean and dry.

Carefully pour the strained watermelon mixture into the molds, leaving a little space at the top for expansion as they freeze. If you want to create a layered effect, you can fill the molds halfway, allow them to freeze for about 30 minutes, and then add the yogurt layer.

Layering with Yogurt

For the creamy layer, take your chosen yogurt and spoon it into the molds on top of the frozen watermelon layer. If you want to create a marbled effect, use a skewer or toothpick to swirl the yogurt into the watermelon base gently.

It’s essential to consider the consistency of your yogurt. If it’s too runny, it may not hold its shape after freezing. If needed, you can place the yogurt in the freezer for a few minutes to thicken it slightly before adding it to the molds.

Coating with Coconut Flakes

Once the yogurt layer is in place, it’s time to add the final touch—the crispy coconut coating. After the popsicles have been in the freezer for about two hours, remove them and carefully dip the tops into a bowl of coconut flakes. Alternatively, you can sprinkle the coconut flakes over the yogurt layer. This step adds an enticing crunch that will make your popsicles even more enjoyable.

After coating them, return the popsicles to the freezer and allow them to set completely for at least another four hours or until solid.

Stay tuned for the next part of this article, where we will explore serving suggestions, storage tips, and creative variations to make your Crispy Watermelon Popsicles even more delightful!
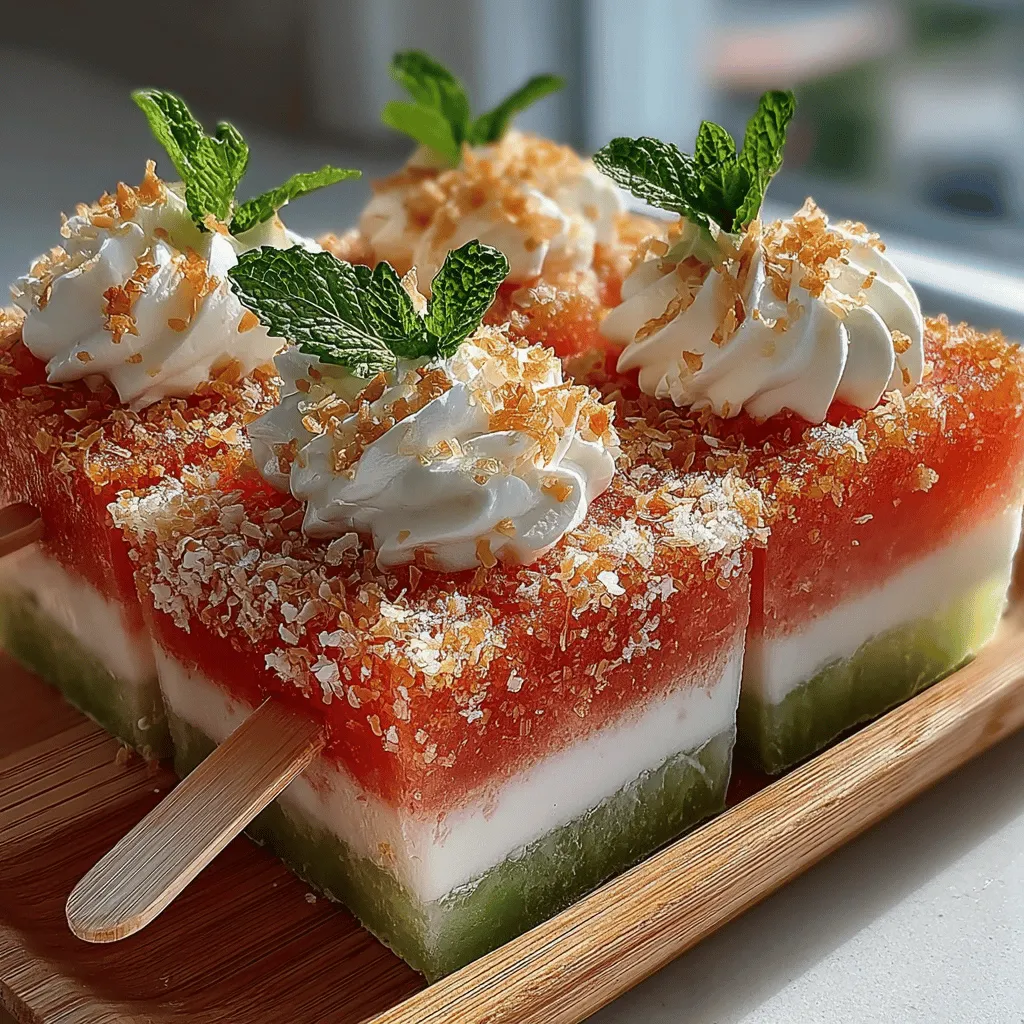
As the sun blazes down and temperatures soar, there's nothing quite like a refreshing treat to cool off. Among the myriad of summer delights, <strong>Crispy Watermelon Popsicles</strong> stand out as a vibrant and nutritious option. These popsicles are a harmonious blend of juicy watermelon, zesty lime, and rich yogurt, all enveloped in a delightful crispy coconut coating. They not only satisfy a sweet craving but also celebrate the wholesome goodness of fresh ingredients, making them a healthier alternative to the mass-produced frozen treats found in stores.” /></p>
</p>
<h2>How to Effectively Coat the Popsicles: Techniques for Even Coverage</h2>
</p>
<p>Coating your watermelon popsicles not only adds flavor but also enhances the overall texture. To achieve an even coating, start by selecting the right mixture. A combination of unsweetened shredded coconut and a light drizzle of honey or agave syrup makes for an irresistible crust.</p>
</p>
<p>1. <strong>Prepare Your Coating Mixture</strong>: In a bowl, mix shredded coconut with a bit of honey or agave syrup. The sweetness will complement the watermelon while helping the coconut adhere better.</p>
<p>2. <strong>Coat Evenly</strong>: Once your watermelon popsicles have been frozen for about 1-2 hours (just enough for them to be firm but not completely solid), remove them from the freezer. Dip each popsicle into the coconut mixture, making sure to roll them around for even coverage.</p>
<p>3. <strong>Use Your Hands</strong>: To ensure that the coating sticks properly, you might find it helpful to use your hands. Gently press the coconut onto the popsicle as you roll it, ensuring every side is well-coated.</p>
</p>
<p>By following these steps, you can achieve a beautifully coated popsicle that is crispy on the outside and juicy on the inside.</p>
</p>
<h2>Adding Extra Coconut for Texture: Enhancing the Popsicle’s Crunch</h2>
</p>
<p>For those who love an extra crunch, incorporating additional coconut into your popsicle can elevate the texture. Here’s how to do it effectively:</p>
</p>
<p>1. <strong>Layering Technique</strong>: Instead of just rolling the popsicle in coconut, consider layering it. After dipping the popsicle in the coconut mixture, sprinkle a handful of extra shredded coconut on top while gently pressing it into the popsicle.</p>
<p>2. <strong>Coconut Chips</strong>: For an even crunchier texture, consider adding coconut chips to the mixture. These larger flakes provide a delightful bite and a different mouthfeel that contrasts beautifully with the creamy base of the popsicle.</p>
</p>
<p>These enhancements not only give your popsicles a unique texture but also make them visually appealing.</p>
</p>
<h3>Freezing to Perfection</h3>
</p>
<p>The freezing process is crucial for creating the perfect crispy watermelon popsicles. Here are some best practices to ensure they turn out just right.</p>
</p>
<h4>Best Practices for Freezing: Time and Temperature Considerations</h4>
</p>
<p>1. <strong>Optimal Freezing Temperature</strong>: Set your freezer to the coldest setting. A temperature of around -10°F (-23°C) is ideal for quickly solidifying your popsicles without forming large ice crystals.</p>
<p>2. <strong>Freezing Time</strong>: Allow the popsicles to freeze for at least 4-6 hours. This gives them enough time to become solid throughout, ensuring a satisfying texture when you bite into them.</p>
</p>
<h4>Ensuring Popsicle Sticks Stay in Place</h4>
</p>
<p>To prevent your popsicle sticks from sliding around, follow these tips:</p>
</p>
<p>1. <strong>Initial Firming</strong>: After pouring the popsicle mixture into molds, place them in the freezer for about 1-2 hours until the mixture is slightly firm. This will help the sticks stay in place when inserted.</p>
<p>2. <strong>Inserting the Sticks</strong>: Once the mixture is firm, carefully remove the molds and insert the sticks until they are halfway submerged. Return the molds to the freezer to complete the freezing process.</p>
</p>
<p>These steps will help maintain the integrity of your popsicles, ensuring that they come out beautifully when it’s time to serve.</p>
</p>
<h3>Unmolding and Serving</h3>
</p>
<p>Once your popsicles are perfectly frozen, it’s time to unmold and present them!</p>
</p>
<h4>Techniques for Easy Unmolding: Tips for Avoiding Breakage</h4>
</p>
<p>1. <strong>Warm Water Bath</strong>: To easily release the popsicles from the molds, dip the bottom of the mold in warm water for about 10-15 seconds. This slight warmth will help loosen the popsicle without compromising its shape.</p>
<p>2. <strong>Gentle Twist</strong>: If the popsicle still resists, gently twist the mold while pulling upwards. This technique helps to release the suction that may have formed during freezing.</p>
</p>
<p>By employing these methods, you can avoid breakage and ensure that your popsicles maintain their beautiful forms.</p>
</p>
<h4>Creative Serving Suggestions: Ideas for Presentation</h4>
</p>
<p>Presentation can make your watermelon popsicles even more appealing. Here are some creative serving ideas:</p>
</p>
<p>1. <strong>Fruit Skewers</strong>: Serve your popsicles with fresh fruit skewers. Thread chunks of watermelon, pineapple, and strawberries onto skewers for a colorful, healthy addition.</p>
<p>2. <strong>Yogurt Dipping Sauce</strong>: Pair your popsicles with a yogurt dip. Simply mix Greek yogurt with a bit of honey and vanilla for a creamy accompaniment.</p>
<p>3. <strong>Decorative Plates</strong>: Arrange your popsicles on a chilled plate or platter, garnished with mint leaves or edible flowers for an elegant touch.</p>
</p>
<p>These simple presentation ideas can elevate your popsicles from simple snacks to impressive summer treats.</p>
</p>
<h3>Nutritional Benefits of Watermelon Popsicles</h3>
</p>
<p>Crispy watermelon popsicles are not just delicious; they also provide several health benefits thanks to their fresh ingredients.</p>
</p>
<h4>Hydration and Nutrients from Watermelon</h4>
</p>
<p>Watermelon is composed of about 92% water, making it one of the most hydrating fruits available. This high water content helps keep you hydrated, especially during hot summer months.</p>
</p>
<p>1. <strong>Vitamins and Antioxidants</strong>: Watermelon is rich in vitamins A and C, which are essential for skin health and immune function. Additionally, it contains lycopene, an antioxidant that may protect against certain diseases.</p>
</p>
<h4>Probiotics and Protein from Yogurt</h4>
</p>
<p>Yogurt is another key ingredient in this recipe, contributing both protein and probiotics.</p>
</p>
<p>1. <strong>Benefits of Greek Yogurt</strong>: Greek yogurt is an excellent source of protein, which is important for muscle repair and overall health. It also contains probiotics, which are beneficial for gut health.</p>
<p>2. <strong>Dairy-Free Option</strong>: For those who prefer a dairy-free alternative, coconut yogurt provides a creamy texture along with healthy fats.</p>
</p>
<h4>Healthy Fats from Coconut</h4>
</p>
<p>Coconut is often praised for its health benefits, particularly its unique fat profile.</p>
</p>
<p>1. <strong>Role of Coconut in a Balanced Diet</strong>: The medium-chain triglycerides (MCTs) found in coconut are easily digestible and may provide a quick source of energy.</p>
<p>2. <strong>Benefits of MCTs</strong>: MCTs have been linked to improved metabolism and weight management, making coconut a healthful addition to your diet.</p>
</p>
<h3>Customization and Variations</h3>
</p>
<p>The beauty of crispy watermelon popsicles lies in their versatility. Feel free to get creative with flavors and ingredients!</p>
</p>
<h4>Flavor Variations</h4>
</p>
<p>1. <strong>Introducing Other Fruits</strong>: Consider mixing in other fruits like strawberries, blueberries, or peaches for an exciting flavor twist. These fruits not only add variety but also enhance the nutritional profile of your popsicles.</p>
<p>2. <strong>Spice It Up</strong>: For a unique flavor twist, add a pinch of chili powder or grated ginger to the watermelon mixture. This will give your popsicles a refreshing kick that is sure to impress.</p>
</p>
<h4>Dietary Adjustments</h4>
</p>
<p>1. <strong>Vegan Adaptations</strong>: To make this recipe vegan, swap out the yogurt for a plant-based yogurt alternative and use maple syrup instead of honey for sweetness.</p>
<p>2. <strong>Allergen-Friendly Options</strong>: Ensure the popsicles are nut-free and gluten-free by using appropriate ingredients. Check labels on all products to guarantee they meet dietary requirements.</p>
</p>
<h4>Presentation Ideas</h4>
</p>
<p>1. <strong>Creative Molds and Shapes</strong>: Use fun molds to create interesting shapes like stars or animals. This can make your popsicles especially appealing to kids.</p>
<p>2. <strong>Serving Suggestions</strong>: Pair your popsicles with fresh fruit or drizzle with a yogurt dip to enhance the flavor and presentation.</p>
</p>
<h3>Conclusion</h3>
</p>
<p>Crispy watermelon popsicles are not just a delicious way to cool down; they also offer a multitude of health benefits and customization options. By combining simple, fresh ingredients, you can create a refreshing treat that the whole family will love. Whether you’re enjoying them at a summer barbecue or as a healthy snack at home, these popsicles are sure to bring a smile to your face. So, embrace the joys of summer and whip up a batch of these delightful popsicles for your next get-together or as a special treat just for you!</p>
</div>

As the sun blazes down and temperatures soar, there's nothing quite like a refreshing treat to cool off. Among the myriad of summer delights, Crispy Watermelon Popsicles stand out as a vibrant and nutritious option. These popsicles are a harmonious blend of juicy watermelon, zesty lime, and rich yogurt, all enveloped in a delightful crispy coconut coating. They not only satisfy a sweet craving but also celebrate the wholesome goodness of fresh ingredients, making them a healthier alternative to the mass-produced frozen treats found in stores.

Crispy Watermelon Popsicles

Beat the summer heat with Crispy Watermelon Popsicles, a delightful treat that combines juicy watermelon, zesty lime, and creamy yogurt, all wrapped in a crunchy coconut coating. These popsicles are not only refreshing but also packed with health benefits. Learn how to make these vibrant frozen snacks at home with easy-to-follow steps, customizable flavors, and presentation tips. Perfect for hot days, they’ll keep you cool and satisfied!

Ingredients
  

1 medium seedless watermelon, cut into 1-inch cubes

1 tablespoon honey or agave syrup (optional)

Juice of 2 limes

1 teaspoon finely chopped mint leaves (optional)

1 cup coconut flakes (unsweetened for a healthier option)

1 cup Greek yogurt or coconut yogurt for a dairy-free option

A pinch of sea salt

Instructions
 

Prepare the Watermelon: Place the watermelon cubes in a blender or food processor. Add in the lime juice, honey/agave syrup, and a pinch of sea salt. Blend until smooth. If desired, mix in the chopped mint leaves for an extra burst of flavor.

    Strain the Mixture: Pour the blended watermelon mixture through a fine mesh strainer into a bowl to remove the pulp. You should have a smooth, juice-like consistency.

      Fill the Molds: Take popsicle molds and pour the watermelon juice into each mold, filling them about 3/4 full. Leave some space at the top for yogurt.

        Layer with Yogurt: Gently spoon the Greek yogurt or coconut yogurt on top of the watermelon juice in each mold, creating a layered effect. Use a skewer or a knife to swirl the yogurt slightly into the watermelon juice for a beautiful marbled look.

          Coat with Coconut Flakes: Before inserting the popsicle sticks, dip the tops into coconut flakes for a crispy texture. You can also sprinkle extra coconut on top of the yogurt layer if desired.

            Insert Sticks and Freeze: Place the popsicle sticks into each mold and place in the freezer. Allow them to freeze for at least 4-6 hours or until completely solid.

              Unmold and Serve: To release the popsicles, run warm water over the outside of the molds for a few seconds. Gently pull the popsicles out and enjoy the deliciously refreshing, crispy watermelon popsicles!

                Prep Time, Total Time, Servings: 15 minutes | 6 hours | 6 popsicles

                  WANT TO SAVE THIS RECIPE?

                  Leave a Comment

                  Recipe Rating


                  Sharing is Caring

                  Help spread the word. You're awesome for doing it!