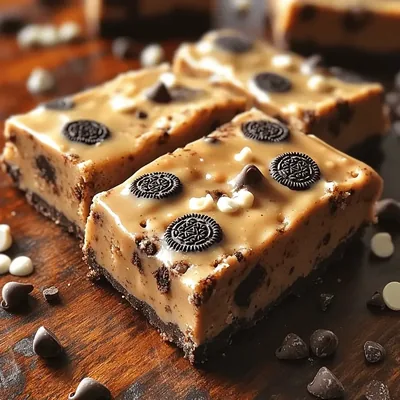
Decadent No-Bake Oreo Cookie Dough Bars

WANT TO SAVE THIS RECIPE?

Decadent No-Bake Oreo Cookie Dough Bars

No-bake desserts have taken the culinary world by storm, captivating dessert lovers with their simplicity and deliciousness. There’s something incredibly appealing about a sweet treat that doesn’t require an oven, making it a go-to option for both novice bakers and seasoned chefs alike. Among the plethora of no-bake recipes, Decadent No-Bake Oreo Cookie Dough Bars stand out for their rich flavors and comforting textures. These bars combine the beloved taste of cookie dough with crunchy Oreo cookies, offering a delightful indulgence that’s hard to resist.

What makes these Oreo Cookie Dough Bars particularly enticing is not just their taste, but also their ease of preparation. With a handful of ingredients and minimal time commitment, you can whip up a luscious dessert that is sure to impress family and friends. Whether you’re hosting a party, bringing a dish to a gathering, or simply treating yourself after a long day, these bars are the perfect solution. Their versatility allows them to shine at any occasion, making them an instant crowd-pleaser.

Understanding No-Bake Desserts

The concept of no-bake desserts is straightforward yet brilliant: you don’t need an oven to create something delicious. This approach to dessert-making has gained immense popularity, particularly among busy individuals and families looking for quick yet satisfying treats. No-bake recipes eliminate the need for precise baking times and temperatures, which can often lead to stress in the kitchen. Instead, these desserts focus on combining ingredients in a way that enhances their natural flavors and textures without the need for heat.

One of the primary benefits of no-bake recipes is their time-saving aspect. Many no-bake desserts can be prepared in under 30 minutes, making them an ideal choice for last-minute cravings or spontaneous get-togethers. Additionally, they usually require minimal kitchen equipment—often only a mixing bowl, spatula, and a baking dish—making cleanup a breeze.

Another critical component of no-bake desserts is the use of safe, heat-treated flour. Since traditional cookie dough often includes raw flour, heat-treating the flour eliminates any potential pathogens, making it safe to consume straight from the bowl. This is a crucial step in our recipe, ensuring that you can enjoy the cookie dough without any worries.

Ingredient Breakdown

To truly appreciate the Decadent No-Bake Oreo Cookie Dough Bars, it’s essential to understand the role of each ingredient used in this recipe:

All-Purpose Flour: While a staple in many baked goods, all-purpose flour must be heat-treated for no-bake recipes. This process involves spreading raw flour on a baking sheet and heating it in the oven for a few minutes to kill any harmful bacteria. This step is vital for safety, allowing you to enjoy the cookie dough without concerns about raw ingredients.

Unsalted Butter: This ingredient is key to achieving the rich creaminess and smooth texture that cookie dough is known for. Unsalted butter provides a neutral flavor base, allowing the other ingredients to shine without the interference of added salt.

Brown Sugar: The use of brown sugar not only sweetens the cookie dough but also adds moisture and a hint of caramel flavor. The molasses in brown sugar gives the bars a deeper taste, balancing beautifully with the crunchiness of the Oreos.

Vanilla Extract and Salt: Both vanilla extract and a pinch of salt are essential in enhancing the overall flavor profile. The vanilla adds warmth and sweetness, while the salt brings out the flavors of the other ingredients, creating a well-rounded dessert.

Mini Chocolate Chips: These little morsels contribute both sweetness and texture, providing delightful bursts of chocolate in every bite. Their smaller size allows for even distribution throughout the bars, ensuring that each piece is a chocolate lover’s dream.

Oreo Cookies: As the star ingredient, Oreos add a delicious crunch and iconic flavor that many people adore. Their chocolatey exterior and creamy filling create a perfect contrast to the cookie dough base, making each bar an irresistible treat.

White Chocolate Chips: Used for drizzling on top of the bars, white chocolate chips add a touch of visual appeal and extra sweetness. This final flourish makes the bars look as decadent as they taste, elevating them to a dessert that’s not only delicious but also beautiful.

Step-by-Step Instructions

Now that you’re familiar with the ingredients that come together to create these sumptuous Oreo Cookie Dough Bars, let’s dive into the preparation process. Each step is designed to ensure that your bars turn out perfectly every time:

1. Preparing the Flour: The first step in making these no-bake bars is to heat-treat your all-purpose flour. Preheat your oven to 350°F (175°C) and spread the flour evenly on a baking sheet. Bake for about 5-7 minutes, stirring halfway through to ensure even heating. Once the flour has cooled, it’s ready to be incorporated into the cookie dough mixture. This crucial step not only ensures safety but also enhances the flavor by slightly toasting the flour.

2. Creaming the Butter and Sugar: In a large mixing bowl, combine the softened unsalted butter and brown sugar. Using a hand mixer or stand mixer, cream the two ingredients together until light and fluffy. This process usually takes about 2-3 minutes. The goal here is to incorporate air into the mixture, which will contribute to the overall texture of the bars.

3. Adding Flavorings: Once the butter and sugar are well combined, add in the vanilla extract and a pinch of salt. Mix until fully incorporated. The salt will balance the sweetness and enhance the flavors, while the vanilla will provide that classic cookie dough taste.

4. Incorporating the Flour: Gradually add the heat-treated flour to the butter-sugar mixture. Mix on low speed until just combined. Be careful not to overmix, as this can lead to a denser texture. The mixture should resemble thick cookie dough.

5. Adding Chocolate Chips and Oreos: Gently fold in the mini chocolate chips and crushed Oreo cookies. Use a spatula to evenly distribute these ingredients throughout the dough. The goal is to create a uniform mixture where every bite contains the delicious crunch and flavor of Oreos.

6. Pressing into the Pan: Line an 8×8-inch baking dish with parchment paper for easy removal later. Transfer the cookie dough mixture into the prepared dish, pressing it down firmly with your hands or the back of a spatula to create an even layer. This step is essential to ensure that the bars hold their shape once set.

These initial steps set the foundation for your Decadent No-Bake Oreo Cookie Dough Bars. As you progress further, you’ll see how easy and satisfying it is to create a dessert that’s as delightful to make as it is to eat. Stay tuned for the next part, where we’ll cover the final steps of completing these bars and how to serve them for maximum enjoyment.

No-bake desserts have taken the culinary world by storm, captivating dessert lovers with their simplicity and deliciousness. There’s something incredibly appealing about a sweet treat that doesn’t require an oven, making it a go-to option for both novice bakers and seasoned chefs alike. Among the plethora of no-bake recipes, Decadent No-Bake Oreo Cookie Dough Bars stand out for their rich flavors and comforting textures. These bars combine the beloved taste of cookie dough with crunchy Oreo cookies, offering a delightful indulgence that’s hard to resist.

Mixing the Base: Techniques for Achieving the Perfect Consistency

To start creating your Decadent No-Bake Oreo Cookie Dough Bars, the first crucial step is mixing the base. Achieving the right consistency is essential for the bars to hold together while maintaining a delightful texture. Begin by creaming together softened unsalted butter and brown sugar in a large mixing bowl. Use a hand mixer or stand mixer on medium speed to ensure the mixture becomes light and fluffy. This process incorporates air, which contributes to a softer final product.

Once the butter and sugar are well-combined, gradually add all-purpose flour and a splash of vanilla extract. It’s important to mix these ingredients just until combined; overmixing can lead to a dense texture. The goal is to create a dough-like consistency that is slightly sticky but still holds its shape. If the mixture feels too dry, you can add a teaspoon of milk at a time until it reaches the desired consistency.

Incorporating Flavorings: Tips for Ensuring Even Distribution

Now that your base is ready, it’s time to incorporate flavorings to enhance the overall taste. The key to achieving an evenly distributed flavor is to add your vanilla extract and a pinch of salt after mixing the butter and sugar but before adding your dry ingredients. This ensures that the flavorings are well-blended throughout the dough.

For this recipe, you may also consider adding a teaspoon of almond extract for a unique twist. When incorporating these flavorings, mix gently to avoid overworking the dough. Remember, the aim is to create a harmonious blend that enhances the rich, sweet profile of the bars without overpowering the Oreo flavor.

Folding in the Goodies: How to Maintain Texture While Mixing

Next, it’s time to fold in the goodies. This step is where the magic truly happens, as you add Oreo cookie crumbs and chocolate chips to your dough. Start by breaking the Oreo cookies into coarse crumbs. You can do this by placing them in a zip-top bag and using a rolling pin, or simply pulsing them in a food processor until they reach your desired crumb size.

When folding these ingredients into the dough, use a spatula to gently incorporate them without overmixing. The objective is to maintain the texture of the cookie dough while ensuring that every bite is filled with crunchy Oreo pieces and melty chocolate chips. Be careful not to crush the Oreo pieces too finely, as you want those delightful bits to provide a satisfying chew in every bar.

Forming the Bars: Best Practices for Pressing the Mixture into the Baking Dish

After mixing in the goodies, it’s time to form your bars. Line an 8×8-inch baking dish with parchment paper, allowing some overhang to make removing the bars easier later. Transfer the cookie dough mixture into the lined dish and, using clean hands or a spatula, press the mixture down firmly and evenly. This step is crucial; the more compact you make the mixture, the better the bars will hold their shape.

To ensure an even surface, you can use the bottom of a measuring cup to press down the dough. Make sure to pack the mixture tightly into the corners of the dish, as this will help create uniform bars once cut. The final layer should be smooth and even, ready for chilling.

Chilling: Significance of This Step for Achieving the Right Texture

Chilling the bars is a vital step in the preparation process. Once you’ve pressed the mixture into the baking dish, cover it with plastic wrap and place it in the refrigerator. Allow the bars to chill for at least 2 hours, or until the dough is firm to the touch. This chilling time helps the flavors meld together and solidifies the structure of the bars, making them easier to slice and ensuring they have that perfect, chewy texture.

If you’re short on time, you can place the dish in the freezer for about 30 minutes, but keep an eye on it to prevent freezing too solid. The goal is a firm, yet soft, cookie dough bar that holds its shape while being easy to bite into.

Drizzling with White Chocolate: Methods for Achieving a Beautiful Finish

Once your bars are chilled and firm, it’s time to add a beautiful finish with a white chocolate drizzle. Start by melting white chocolate chips in a microwave-safe bowl. Heat them in 30-second intervals, stirring in between, until the chocolate is completely melted and smooth. If you find the chocolate too thick for drizzling, you can add a teaspoon of coconut oil or vegetable oil to thin it out slightly.

Using a fork or a piping bag, drizzle the melted white chocolate over the chilled bars. This not only adds a stunning visual element but also enhances the flavor profile with creamy sweetness that pairs perfectly with the rich cookie dough. Allow the chocolate to set for a few minutes before cutting the bars into squares.

Cutting and Serving: Tips for Presenting the Dessert Attractively

To cut the bars, remove them from the baking dish using the parchment paper overhang. Place them on a cutting board and use a sharp knife to slice them into squares or rectangles. For clean cuts, wipe the knife with a damp cloth between slices. This will help prevent the chocolate from smearing and ensure a clean presentation.

When serving, consider arranging the bars on a decorative plate or a tiered stand for an appealing display. These bars are perfect for dessert tables, casual gatherings, or as a sweet treat to enjoy with your family. Pair them with a glass of cold milk or a cup of coffee for a delightful experience.

Texture and Flavor Profile

The texture of these Decadent No-Bake Oreo Cookie Dough Bars is a delightful combination of soft yet firm, with a satisfying chew from the Oreo pieces and the luscious chocolate chips. The bars melt in your mouth while providing enough structure to hold their shape.

In terms of flavor profile, these bars strike a perfect balance between sweetness and richness. The sweetness of the brown sugar and white chocolate complements the deep, rich flavor of the Oreos, while the vanilla extract adds a subtle hint that rounds out the taste. Each bite offers a burst of chocolatey goodness, making them an irresistible treat for cookie dough lovers.

These bars shine at various occasions, such as birthday parties, potlucks, or casual get-togethers. They also make a thoughtful gift for family and friends or a delightful addition to a dessert table.

Storage and Shelf Life

To keep your No-Bake Oreo Cookie Dough Bars fresh, store them in an airtight container. Layer the bars between sheets of parchment paper to prevent sticking. These bars can be kept in the refrigerator for up to one week, although they are best enjoyed within the first few days for optimal freshness.

If you want to make them ahead of time, you can freeze the bars. Wrap them tightly in plastic wrap and place them in an airtight container. They can be stored in the freezer for up to three months. When ready to enjoy, simply thaw them in the refrigerator for a few hours before serving. Keep an eye out for signs of freshness loss, such as an off smell or changes in texture, which indicate that it’s time to discard them.

Nutritional Information

Each bar contains approximately 200 calories, making them a rich treat that should be enjoyed in moderation. The bars are primarily made from ingredients like flour, butter, Oreos, and chocolate chips, contributing to their caloric content.

For those with dietary restrictions, you can easily make adjustments. For a gluten-free version, substitute the all-purpose flour with a gluten-free flour blend, and ensure that the Oreos used are certified gluten-free. This way, everyone can enjoy these indulgent treats without compromising their dietary needs.

Conclusion

Making and enjoying Decadent No-Bake Oreo Cookie Dough Bars brings joy and satisfaction to both the cook and the taste testers. This simple yet indulgent recipe allows you to express your creativity in the kitchen while delivering a delicious treat that everyone will love.

Embrace the convenience and fun of no-bake desserts for future occasions, whether it’s a family gathering or a simple weeknight treat. With these bars, you’re not only satisfying your sweet tooth but also creating memorable moments in the kitchen. So gather your ingredients, invite friends or family to join in the fun, and indulge in the delightful experience of making these bars. Happy baking!

No-bake desserts have taken the culinary world by storm, captivating dessert lovers with their simplicity and deliciousness. There’s something incredibly appealing about a sweet treat that doesn’t require an oven, making it a go-to option for both novice bakers and seasoned chefs alike. Among the plethora of no-bake recipes, Decadent No-Bake Oreo Cookie Dough Bars stand out for their rich flavors and comforting textures. These bars combine the beloved taste of cookie dough with crunchy Oreo cookies, offering a delightful indulgence that’s hard to resist.

No-Bake Oreo Cookie Dough Bars

Indulge in the rich flavors of Decadent No-Bake Oreo Cookie Dough Bars! These simple, no-bake treats combine creamy cookie dough with crunchy Oreo pieces, creating a delightful dessert that's perfect for any occasion. With minimal prep and no oven required, they come together in under 30 minutes for a quick sweet fix. This recipe is great for gatherings, parties, or just a cozy night in. Enjoy the irresistible fusion of textures and flavors in every bite!

Ingredients
  

1 cup all-purpose flour (heat-treated)

½ cup unsalted butter, softened

¾ cup brown sugar, packed

1 tsp vanilla extract

¼ tsp salt

½ cup mini chocolate chips

10 Oreo cookies, crushed into small pieces

½ cup white chocolate chips (for drizzling)

Instructions
 

Prepare the Flour:

    - To ensure safety, heat-treat your flour by spreading it on a baking sheet and baking it at 350°F (175°C) for 5-10 minutes. Let it cool before using.

      Mix the Base:

        - In a large mixing bowl, beat the softened butter and brown sugar together with an electric mixer until light and fluffy, about 2-3 minutes.

          Add Flavorings:

            - Mix in the vanilla extract and salt until well combined.

              Incorporate Flour:

                - Gradually add the heat-treated flour to the butter mixture, beating on low speed until just combined.

                  Fold in the Goodies:

                    - Gently fold in the mini chocolate chips and crushed Oreo pieces until evenly distributed.

                      Form the Bars:

                        - Line an 8x8 inch baking dish with parchment paper, leaving some overhang for easy removal. Press the cookie dough mixture evenly into the bottom of the dish, smoothing the top with a spatula.

                          Chill:

                            - Cover the dish with plastic wrap and refrigerate for at least 30 minutes, or until firm.

                              Drizzle with White Chocolate:

                                - Melt the white chocolate chips in the microwave in 20-second intervals, stirring until smooth. Drizzle the melted white chocolate over the chilled bars using a fork or piping bag.

                                  Cut and Serve:

                                    - Using the parchment overhang, lift the bars out of the dish. Cut into squares and serve chilled or at room temperature. Enjoy!

                                      Prep Time: 15 minutes | Total Time: 45 minutes | Servings: 12 pieces

                                        WANT TO SAVE THIS RECIPE?

                                        Leave a Comment

                                        Recipe Rating


                                        Sharing is Caring

                                        Help spread the word. You're awesome for doing it!