Imagine a humble root vegetable transformed into a vibrant, smoky masterpiece that sings with the bold flavors of North Africa. Fiery Harissa Roasted Carrots bring that vision to life, turning everyday carrots into a show‑stopping side or a hearty vegetarian main.
What makes this dish truly special is the marriage of sweet caramelized carrot edges with a bright, peppery harissa glaze, finished with a drizzle of citrus‑yogurt for balance. The result is a complex, layered taste that feels both exotic and comforting.
Carrot lovers, spice enthusiasts, and anyone looking for a plant‑forward dinner will adore this recipe. It shines at weeknight meals, festive gatherings, or as a colorful addition to a brunch spread.
The process is straightforward: coat carrot spears in a harissa‑olive‑oil mixture, roast until tender‑golden, then finish with a quick toss of lemon‑yogurt sauce and fresh herbs. In under an hour you’ll have a dish that transports your palate straight to a bustling Marrakech market.
Why You'll Love This Recipe
Bold North‑African Flair: Harissa delivers a smoky heat that elevates simple carrots into a globally inspired centerpiece, perfect for adventurous eaters.
Effortless One‑Pan Cooking: Roast, glaze, and finish all on the same sheet, minimizing cleanup while maximizing flavor development.
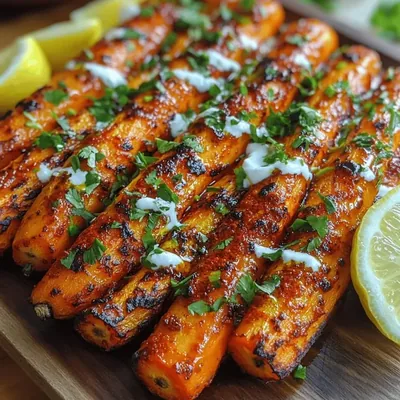
Vibrant Color & Texture: The deep orange‑red glaze contrasts beautifully with the caramelized carrot tops, making the dish as eye‑catching as it is tasty.
Nutritious & Satisfying: Carrots bring beta‑carotene and fiber, while the yogurt drizzle adds protein and a creamy tang without heaviness.
Ingredients
This recipe leans on a handful of high‑impact ingredients that each play a specific role. Fresh carrots provide natural sweetness and a sturdy canvas for the glaze. Harissa, a chili‑pepper paste, supplies smoky heat, while olive oil carries the flavors and encourages caramelization. Lemon‑yogurt adds a cooling finish, and herbs bring brightness. Together they create a balanced, aromatic profile that’s both comforting and exotic.
Main Ingredients
- 1.5 lb (≈ 700 g) carrots, peeled and cut into ½‑inch sticks
- 2 tablespoons extra‑virgin olive oil
Harissa Glaze
- 3 tablespoons harissa paste (adjust for heat)
- 1 tablespoon honey or agave syrup
- 1 teaspoon smoked paprika
Finishing Sauce & Garnish
- ¼ cup plain Greek yogurt
- 1 tablespoon fresh lemon juice
- 2 tablespoons chopped fresh cilantro or parsley
- Sea salt and freshly ground black pepper, to taste
The olive oil helps the carrots develop a deep caramelized crust while the harissa glaze infuses them with smoky, spicy depth. Honey balances the heat with a subtle sweetness, and smoked paprika reinforces the charred notes. The lemon‑yogurt drizzle cools the palate just enough to keep the dish approachable, while fresh herbs add a burst of herbaceous aroma that lifts the entire plate.
Step-by-Step Instructions
Preparing the Carrots
Begin by preheating your oven to 425°F (220°C). While the oven warms, place the carrot sticks on a large rimmed baking sheet. Drizzle with 2 tablespoons extra‑virgin olive oil and toss to coat evenly. Season lightly with salt and pepper; this initial seasoning helps draw out moisture, allowing the carrots to roast rather than steam.
Making the Harissa Glaze
In a small bowl, whisk together 3 tablespoons harissa paste, 1 tablespoon honey, and 1 teaspoon smoked paprika until smooth. The honey not only sweetens but also aids caramelization, while smoked paprika deepens the smoky undertone. Adjust the harissa amount if you prefer milder or hotter heat.
Roasting & Glazing
- Initial Roast. Spread the oiled carrots in a single layer and roast for 15 minutes, turning once halfway through. This stage creates a golden exterior that will later cling to the glaze.
- Apply Harissa Glaze. Remove the sheet, drizzle the harissa mixture over the carrots, and toss gently to ensure each piece is coated. The glaze should cling, not pool.
- Finish Roasting. Return the carrots to the oven and roast for an additional 10‑12 minutes, or until they are tender‑inside and the glaze is slightly caramelized. Look for a glossy, deep‑red sheen as the visual cue of perfection.
Finishing Sauce & Serving
While the carrots finish, whisk together ¼ cup plain Greek yogurt, 1 tablespoon fresh lemon juice, and a pinch of salt. Once the carrots are out of the oven, drizzle the lemon‑yogurt sauce over them, then sprinkle with 2 tablespoons chopped cilantro or parsley. The cool, tangy sauce softens the heat, creating a harmonious balance. Serve immediately, either as a side or as a main paired with couscous or quinoa.
Tips & Tricks
Perfecting the Recipe
Uniform Cuts. Slice carrots to the same thickness so they roast evenly; uneven pieces can result in burnt edges and undercooked centers.
High Heat. A hot oven (425°F) is essential for caramelization; lower temperatures produce soft, steamed carrots instead of a crisp glaze.
Dry Carrots. Pat the carrot sticks dry after washing. Excess moisture creates steam, preventing the desired browning.
Glaze Timing. Apply the harissa glaze midway through roasting; this avoids burning the sugars in honey while still achieving a glossy finish.
Flavor Enhancements
Finish with a squeeze of fresh lemon zest for extra brightness, or stir in a tablespoon of toasted pine nuts for crunch. A drizzle of pomegranate molasses adds a sweet‑tart dimension that pairs beautifully with the smoky harissa.
Common Mistakes to Avoid
Skipping the initial 15‑minute roast will leave the carrots soggy, and over‑glazing before the first roast can cause the honey to burn. Also, avoid crowding the baking sheet; crowded carrots steam instead of caramelize.
Pro Tips
Use a Light‑Colored Sheet. A pale baking sheet lets you see the caramelization progress more clearly, preventing accidental over‑browning.
Rest After Roasting. Let the carrots sit for 2‑3 minutes before adding the yogurt sauce; this prevents the sauce from melting too quickly and keeps the glaze intact.
Adjust Heat Gradually. If you’re new to harissa, start with 2 tablespoons and taste before adding more; the spice level can vary by brand.
Finish with Fresh Herbs. Adding cilantro or parsley at the very end preserves their bright flavor and vibrant color.
Variations
Ingredient Swaps
Swap carrots for sweet potatoes or butternut squash for a heartier texture. Replace harissa with a blend of gochujang and smoked paprika for an Asian‑inspired twist. For added protein, toss in a cup of cooked chickpeas during the final 5 minutes of roasting.
Dietary Adjustments
To keep the dish vegan, substitute Greek yogurt with plant‑based coconut yogurt and use maple syrup instead of honey. For a low‑sodium version, reduce the added salt and rely on the natural sweetness of the carrots and the depth of the harissa.
Serving Suggestions
Pair with fluffy couscous, herbed quinoa, or a simple lentil salad for a complete meal. A side of warm flatbread is perfect for scooping up any remaining glaze, while a crisp cucumber‑mint salad offers a refreshing contrast to the spice.
Storage Info
Leftover Storage
Cool the carrots to room temperature, then transfer them to an airtight container. Store in the refrigerator for up to 4 days. For longer keeping, portion into freezer‑safe bags, removing as much air as possible, and freeze for up to 3 months. The glaze may thicken when cold; simply re‑heat to loosen it.
Reheating Instructions
Reheat in a 350°F (175°C) oven for 10‑12 minutes, covered with foil to retain moisture. Alternatively, toss the leftovers in a hot skillet with a splash of water or broth for 3‑4 minutes, then finish with a fresh dollop of lemon‑yogurt sauce to revive the bright flavors.
Frequently Asked Questions
This Fiery Harissa Roasted Carrots recipe delivers bold, smoky heat balanced by a cool lemon‑yogurt finish, all while staying simple enough for any weeknight. We’ve covered ingredient selection, precise roasting steps, storage tips, and creative variations so you can tailor it to your pantry and palate. Feel free to experiment with swaps or spice levels—cooking is an adventure, not a rulebook. Serve it hot, share it wide, and enjoy the vibrant flavors of North Africa right at your table.