Crispy Back to School Tacos: A Deliciously Fun Recipe
As the summer days wane and the school bells ring again, families everywhere find themselves navigating the busy, whirlwind pace of the back-to-school season. Amid the flurry of new schedules, supply shopping, and extracurricular activities, one thing remains essential: mealtime. Quick, easy, and delicious recipes take center stage as caregivers strive to prepare nutritious meals that kids will actually want to eat. Enter the Crispy Back to School Tacos, a delightful solution that combines fun and flavor, ensuring that even the busiest of evenings can end with a satisfying meal.
These tacos are not just a delicious dinner option; they embody the spirit of family togetherness and creativity in the kitchen. With customizable fillings and a satisfying crunch, these tacos are sure to please even the pickiest of eaters. This recipe is designed to be straightforward, allowing families to engage in the cooking process together, making it a perfect activity for those hectic school nights.
Understanding the Ingredients
The foundation of any great recipe lies in its ingredients, and the Crispy Back to School Tacos are no exception. Each component plays a vital role in crafting a meal that is both tasty and nutritious.
Ground Beef or Turkey
At the heart of these tacos is the protein source, which can be either ground beef or turkey. Ground beef provides a rich, savory flavor that many people love, while ground turkey offers a leaner alternative without sacrificing taste. Both options deliver the essential protein needed for growing kids and active parents alike.
Taco Seasoning
To elevate the flavor profile, taco seasoning is a key ingredient. This blend of spices typically includes chili powder, cumin, garlic powder, and onion powder, among others. The seasoning not only enhances the taste of the meat but also brings a delightful aroma to the kitchen, making mealtime even more inviting. You can use store-bought seasoning or create your own blend to suit your family’s preferences.
Corn Tortillas
Corn tortillas serve as the crispy base for the tacos. Their unique texture and flavor provide a delightful contrast to the savory filling. When fried, these tortillas become golden and crispy, adding an irresistible crunch that enhances the overall eating experience. Not only are corn tortillas gluten-free, but they also contribute to the authentic taco experience that many strive for.
Fresh Vegetables
No taco is complete without a colorful array of fresh vegetables. Ingredients like lettuce, tomatoes, and bell peppers not only add vital nutrients but also create a vibrant presentation. The crunch of fresh vegetables complements the richness of the filling and adds layers of flavor that make each bite exciting.
Cheese, Sour Cream, and Salsa
Finally, the finishing touches of cheese, sour cream, and salsa bring a luxurious richness and depth to the dish. Shredded cheese melts beautifully over the warm filling, while sour cream adds a creamy tang that balances the spices. Salsa, whether mild or spicy, introduces an additional layer of flavor and freshness that rounds out the tacos perfectly.
Preparation of the Filling
Now that we’ve explored the essential ingredients, it’s time to dive into the preparation of the filling, which is a crucial step in creating these delicious crispy tacos.
Step 1: Sautéing the Aromatics
Begin by finely dicing a medium onion and a bell pepper. In a large skillet over medium heat, add a drizzle of oil and sauté the onion and bell pepper until they become soft and fragrant, about 5-7 minutes. This step is vital as it develops the flavor base of your filling. The natural sweetness of the onions and the slight crunch of the bell peppers will enhance the overall texture of the tacos, providing a satisfying bite.
Step 2: Cooking the Protein
Next, add your choice of ground beef or turkey to the skillet with the sautéed vegetables. Use a wooden spoon to break the meat into small pieces as it cooks. It’s important to cook the meat thoroughly, allowing it to brown evenly to achieve the best texture and flavor. For ground beef, look for a good balance of fat; an 80/20 blend is ideal for juiciness. For ground turkey, a bit of olive oil can help to keep it moist.
Step 3: Seasoning the Mixture
Once the meat is cooked through, it’s time to add your taco seasoning. Sprinkle the seasoning over the meat and vegetable mixture, then stir to combine. Allow the seasoning to cook for an additional minute or two. This step is essential for balancing the flavors and ensuring that each bite is packed with that classic taco taste. If the mixture appears too dry, consider adding a splash of water or broth to help the spices adhere to the meat.
Step 4: Cooling the Filling
After cooking, remove the skillet from heat and allow the filling to cool slightly. This step is often overlooked, but it is important for a few reasons. First, cooling the filling makes it easier to handle during assembly. Second, it prevents the tortillas from becoming soggy when filled. A well-prepared filling ensures that your tacos maintain their crispiness, resulting in the ultimate taco experience.
Crisping the Tortillas
With the filling prepared, the next step is to crisp the tortillas, which is what truly sets these tacos apart.
The Frying Process
In a separate skillet, pour in enough vegetable oil to cover the bottom of the pan by about 1/4 inch. Heat the oil over medium-high heat until it shimmers. To test if the oil is hot enough, you can drop a small piece of tortilla into the oil; if it sizzles upon contact, the oil is ready.
Carefully add one tortilla at a time to the hot oil. Fry for about 30 seconds on each side, or until golden brown and crispy. Be cautious not to overcrowd the pan, as this can lower the oil temperature and result in soggy tortillas. Once fried, remove the tortillas from the oil and place them on a plate lined with paper towels to absorb any excess oil.
The significance of using vegetable oil cannot be overstated. It has a high smoke point, making it ideal for frying. The result is a perfectly crisp tortilla that serves as the perfect vessel for your delicious filling.
By following these initial steps, you’re well on your way to creating a memorable meal that combines ease, nutrition, and fun. The Crispy Back to School Tacos are not just a meal; they are an experience, one that can bring families together even on the busiest of evenings. Stay tuned for the next part, where we’ll discuss assembling the tacos and adding those final touches that will leave everyone asking for seconds.
Techniques for Frying Tortillas: Safety Tips and Optimal Frying Time
Frying tortillas is a crucial step in achieving the perfect crispy taco shell. To ensure safety and optimal results, follow these essential tips:
Safety Tips
1. Use a Deep Fry Thermometer: Maintaining the right oil temperature is vital. Aim for 350°F to 375°F. This temperature range ensures the tortillas fry quickly, creating a crispy texture without absorbing too much oil.
2. Choose the Right Oil: Use oils with high smoke points, such as canola, vegetable, or peanut oil. These oils withstand high temperatures without burning, resulting in better-tasting tacos.
3. Work in Batches: Frying too many tortillas at once can lower the oil temperature, leading to soggy shells. Fry 2-3 tortillas at a time, depending on the size of your pan.
4. Stay Vigilant: Keep an eye on the tortillas as they fry. They can go from perfectly crispy to burnt in seconds.
Optimal Frying Time
Fry each tortilla for about 30-45 seconds on each side. The goal is to achieve a golden-brown color while ensuring they are crispy but not overly hard. Adjust the frying time based on the thickness of your tortillas—thicker ones may require a bit longer.
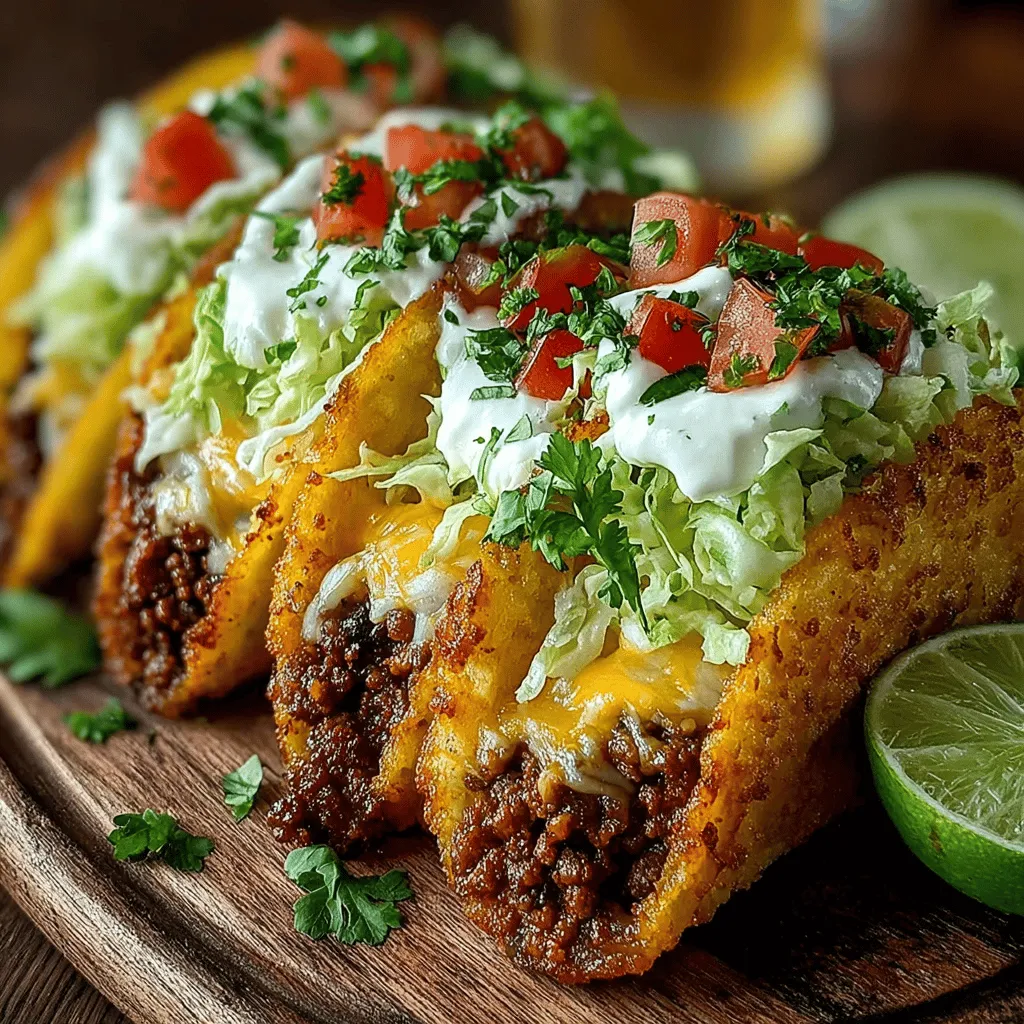
Assembling the Tacos
Once you have your crispy taco shells ready, it’s time to assemble the tacos! This is where the fun begins, and you can get creative with flavors and textures.
Step-by-Step Guide to Assembling the Tacos
1. Start with the Shell: Begin with a crispy tortilla shell as your base.
2. Add the Filling: Spoon in your desired protein filling, ensuring it’s evenly distributed. Consider using seasoned ground beef, shredded chicken, or plant-based protein for a vegetarian option.
3. Layer on the Cheese: Sprinkle a generous amount of shredded cheese on top of the filling. Cheddar, Monterey Jack, or a Mexican blend work beautifully.
4. Top with Fresh Veggies: Add diced tomatoes, chopped lettuce, and avocado slices. These ingredients add freshness and crunch to your tacos.
5. Finish with Sauce: Drizzle your favorite taco sauce or salsa over the top, followed by a dollop of sour cream or yogurt for creaminess.
Layering Techniques: How to Create the Perfect Bite
To ensure every bite is packed with flavor, think about how you layer your ingredients. Start with the filling at the bottom, followed by cheese to hold everything together, then add the veggies, and finish with sauces on top. This layering technique ensures that each bite contains a balance of textures and flavors.
Suggestions for Personalizing Toppings Based on Family Preferences
Customization is key when it comes to tacos. Here are some topping ideas that can cater to different tastes:
– Spicy Lovers: Add jalapeños or a spicy salsa for an extra kick.
– Fresh Flavors: Include diced red onions, radishes, or a sprinkle of cotija cheese.
– Herb Enthusiasts: Fresh cilantro adds a burst of flavor, while diced green onions can enhance the taste.
– Creamy Options: Consider adding guacamole or a drizzle of chipotle mayo for creaminess.
The Role of Fresh Cilantro and Lime Wedges in Enhancing Flavor
Fresh cilantro is a classic taco garnish that adds brightness and depth to your dish. The citrus notes of lime juice help balance the richness of the filling and cheese. Serve lime wedges alongside your tacos, inviting everyone to squeeze a bit of lime over their tacos for an extra zesty flavor boost.
Serving Suggestions
Presenting your tacos well can elevate the entire meal experience. Here are some ideas for serving them up:
Ideas for Presenting the Tacos on a Platter
Arrange your assembled tacos on a large serving platter, standing them upright to showcase their colorful fillings. Garnish the platter with additional lime wedges, fresh cilantro sprigs, and small bowls of extra toppings, allowing guests to customize their tacos as they wish.
Accompaniments that Pair Well with Tacos
Complement your crispy tacos with sides that enhance the meal:
– Mexican Rice: Fluffy, seasoned rice adds a hearty touch.
– Refried Beans: Creamy beans provide protein and fiber, making the meal more filling.
– Corn Salad: A refreshing corn salad with lime and cilantro pairs beautifully with tacos.
– Drinks: Offer refreshing beverages like horchata, agua fresca, or a light beer to round out the meal.
The Joy of Sharing Tacos as a Family Meal
Tacos are inherently social, making them perfect for family dinners. Encourage everyone to gather around the table, build their own tacos, and enjoy the communal experience of sharing a meal. This interactive dining style not only fosters connection but also allows for creativity in flavor combinations.
Suggestions for Storing Leftovers: Ensuring Freshness for the Next Day
If you have leftover filling and shells, store them separately to maintain the taco’s integrity. Place the filling in an airtight container and refrigerate. For the taco shells, store them in a cool, dry place, ideally in a resealable bag. When ready to enjoy again, reheat the filling on the stovetop and crisp up the shells in the oven for the best results.
Nutritional Considerations
Crispy Back to School Tacos can be a nutritious meal option when prepared with care. Here’s a breakdown of the nutritional benefits of the main ingredients:
Breakdown of Nutritional Benefits of Main Ingredients
– Tortillas: Whole grain tortillas provide fiber and essential nutrients. Opt for corn or whole wheat options for added health benefits.
– Protein Fillings: Using lean meats like chicken or turkey can offer high protein content with lower fat. For a vegetarian option, beans or lentils are excellent sources of protein and fiber.
– Fresh Vegetables: Filling your tacos with veggies like lettuce, tomatoes, and avocados adds vitamins, minerals, and healthy fats.
Healthier Options for Tortillas and Toppings
Consider using baked or air-fried tortillas for a lower-fat option. Additionally, switch out sour cream for Greek yogurt to increase protein while reducing excess calories and fat. You can also explore dairy-free cheese options for those who are lactose intolerant.
Discussion on Customizing the Recipe for Dietary Preferences
This taco recipe can easily be adapted to fit various dietary needs:
– Vegetarian: Use black beans, chickpeas, or grilled vegetables as the filling.
– Gluten-Free: Opt for corn tortillas to ensure the dish is gluten-free.
– Low-Carb: For a keto-friendly version, use lettuce wraps instead of tortillas and add more protein and cheese.
Conclusion
Crispy Back to School Tacos are not only a delicious family meal but also a fun way to engage with your loved ones during mealtime. With a perfect blend of flavors, textures, and nutritional value, this recipe caters to a variety of tastes and dietary preferences.
Encourage your family to try this recipe for a delightful culinary experience that combines ease of preparation with the joy of sharing. Whether enjoyed as a quick weeknight dinner or a festive family gathering, these tacos are sure to become a favorite. Embrace the balance of nutrition, flavor, and fun that comes with making and enjoying crispy tacos together. Happy cooking!