
Imagine a breakfast treat that feels like a summer picnic in a bite—sweet raspberries, bright lemon, and a buttery crumb, all chilled to perfection. Fruity Bliss Frozen Raspberry Lemonade Bars capture that sunshine feeling, turning ordinary brunch into a celebration of flavor and texture.
What makes these bars truly special is the contrast between a crisp, shortbread crust and a silky raspberry‑lemon curd that’s frozen just enough to hold its shape yet soft enough to melt on your tongue. A light drizzle of honey‑yogurt glaze finishes the bar with a glossy, tangy sparkle.
Busy parents, brunch hosts, and anyone who craves a refreshing yet indulgent morning bite will love these bars. They’re perfect for weekend brunches, holiday breakfasts, or a make‑ahead snack that stays cool on a hot day.
The process is straightforward: bake a buttery crust, whisk together a raspberry‑lemon curd, assemble the layers, then freeze until firm. A quick glaze adds the final shine, and you’re ready to slice, serve, and savor.
Why You'll Love This Recipe
Bright, Tangy Flavor: Fresh raspberries and real lemon juice give each bite a lively, citrus‑kissed sweetness that awakens the palate without overwhelming it.
Make‑Ahead Convenience: Once frozen, the bars keep for up to three days, so you can prepare them the night before and serve a flawless brunch with minimal effort.
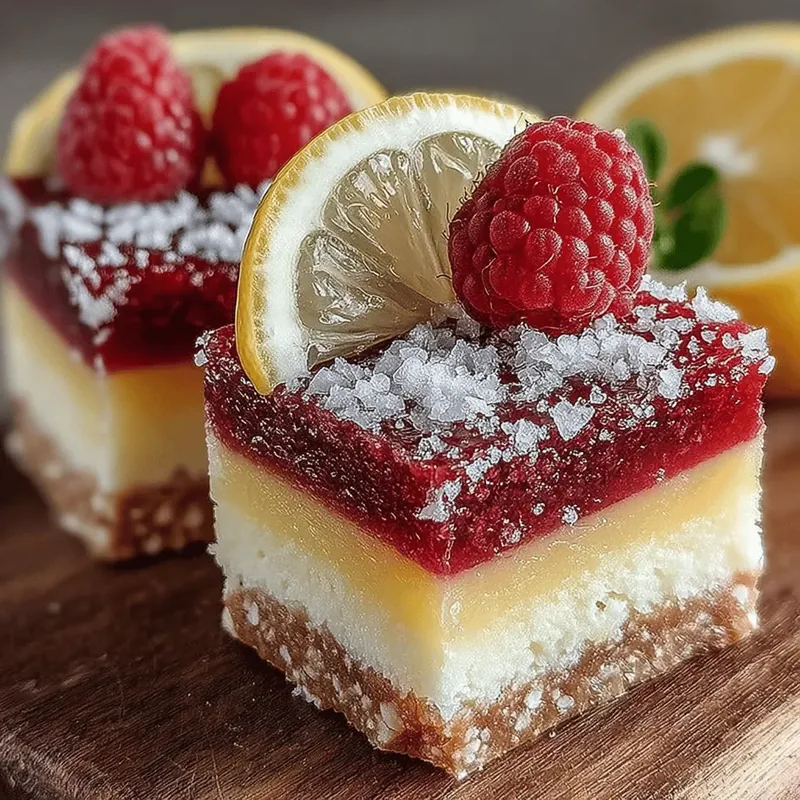
Eye‑Catching Presentation: The vivid ruby hue of the raspberry curd against a golden crust looks as impressive as it tastes, making your brunch table Instagram‑ready.
Balanced Nutrition: The recipe combines whole‑grain flour, fresh fruit, and a modest amount of honey, delivering natural sugars, fiber, and a touch of protein from the yogurt glaze.
Ingredients
The foundation of these bars is a shortbread crust that provides a buttery crunch, while the raspberry‑lemon curd delivers a bright, fruity center. A light honey‑yogurt glaze adds a silky finish and a hint of sweetness. Each component is chosen to complement the others, creating a harmonious balance of texture and flavor.
Shortbread Crust
- 1 ¼ cups all‑purpose flour
- ¼ cup whole‑wheat flour
- ⅓ cup granulated sugar
- ⅔ cup unsalted butter, cold and cubed
- Pinch of sea salt
Raspberry Lemonade Curd
- 1 cup fresh raspberries, plus extra for garnish
- ¼ cup freshly squeezed lemon juice (about 2 lemons)
- ¼ cup honey or maple syrup
- 2 large eggs, lightly beaten
- 2 tablespoons unsalted butter, melted
- ¼ teaspoon vanilla extract
Honey‑Yogurt Glaze
- ½ cup plain Greek yogurt
- 2 tablespoons honey
- 1 teaspoon lemon zest
The blend of all‑purpose and whole‑wheat flour gives the crust a tender crumb while adding a subtle nutty note. Butter and sugar create a shortbread that stays crisp even after freezing. Fresh raspberries provide natural color and a burst of tartness, balanced by lemon juice and honey for a harmonious curd. The glaze’s creamy yogurt adds a tangy finish that keeps the bar from feeling overly sweet.
Step-by-Step Instructions
Making the Shortbread Crust
In a large bowl, whisk together the all‑purpose and whole‑wheat flours, sugar, and sea salt. Add the cold butter cubes and, using a pastry cutter or your fingertips, work the butter into the dry ingredients until the mixture resembles coarse crumbs. This step ensures a flaky texture once baked.
- Press the dough. Transfer the crumb mixture to a parchment‑lined 9×13‑inch baking pan. Press firmly with the back of a measuring cup, creating an even layer about ½‑inch thick. Even pressure prevents gaps that could cause the crust to crumble after freezing.
- Bake the crust. Preheat the oven to 350°F (175°C). Bake for 12‑15 minutes, or until the edges turn a light golden brown. Watch closely; over‑baking will make the base too hard to bite through when frozen.
- Cool completely. Remove the pan from the oven and let the crust cool on a wire rack for at least 10 minutes. Cooling prevents the curd from melting the crust when it’s poured on top.
Preparing the Raspberry Lemonade Curd
While the crust bakes, combine raspberries, lemon juice, honey, and vanilla in a medium saucepan. Cook over medium heat, stirring occasionally, until the berries break down and the mixture thickens, about 5‑7 minutes. This creates a flavorful base that will later be enriched with eggs.
- Temper the eggs. In a separate bowl, whisk the beaten eggs. Slowly drizzle about a quarter of the hot raspberry mixture into the eggs while whisking constantly—this prevents curdling. Then pour the tempered eggs back into the saucepan.
- Thicken the curd. Reduce the heat to low and stir continuously for 3‑4 minutes until the mixture coats the back of a spoon. Add the melted butter and continue stirring for another minute; the butter gives the curd a glossy finish.
- Strain and chill. Pass the curd through a fine‑mesh sieve into a bowl to remove seeds and achieve a smooth texture. Cover with plastic wrap directly on the surface and refrigerate until completely cold, about 30 minutes.
Assembling and Freezing the Bars
Once the crust is cool and the curd is chilled, spread the curd evenly over the shortbread base, smoothing the top with a spatula. The curd should be thick but still pourable, allowing it to set firmly once frozen.
- Freeze the assembled pan. Place the pan in the freezer for at least 2 hours, or until the curd is solid enough to cut cleanly. A firm set prevents the bars from sliding apart.
- Make the glaze. Whisk together Greek yogurt, honey, and lemon zest in a small bowl. The glaze should be smooth and slightly runny.
- Drizzle and garnish. Remove the pan from the freezer, drizzle the honey‑yogurt glaze over the top, and scatter fresh raspberries and a pinch of lemon zest for color.
- Slice and serve. Using a hot, sharp knife, cut the chilled slab into twelve even bars. Serve immediately or keep frozen until ready to enjoy.
Tips & Tricks
Perfecting the Recipe
Cold Butter is Key. Keep the butter chilled until it meets the flour. Cold fat creates steam pockets that yield a tender, flaky crust.
Don’t Over‑mix the Curd. Stir just until the eggs thicken; over‑mixing can cause a grainy texture instead of a silky finish.
Flavor Enhancements
Add a splash of orange liqueur to the curd for a subtle depth, or fold in a teaspoon of finely grated ginger for a gentle zing. A light dusting of powdered sugar just before serving adds a decorative sweet touch without altering the flavor balance.
Common Mistakes to Avoid
Avoid pouring a warm curd onto a hot crust; the heat can melt the butter and make the base soggy. Also, don’t skip the straining step—seeds create an uneven texture and can affect the bar’s visual appeal.
Pro Tips
Use a Hot Knife. Dip the knife in hot water, wipe dry, and slice. This gives clean cuts through the frozen curd without shattering the bars.
Layer Evenly. Spread the curd with a rubber spatula, ensuring the edges meet the crust. Uniform thickness guarantees consistent freezing and bite size.
Chill the Pan. Before adding the curd, place the baked crust in the freezer for 10 minutes. A cold base helps the curd set faster and reduces the risk of cracks.
Variations
Ingredient Swaps
Swap fresh raspberries for frozen mixed berries or sliced strawberries for a different hue. Replace lemon juice with lime for a tropical twist, or use agave nectar instead of honey for a milder sweetness. For a richer crust, substitute half the butter with coconut oil.
Dietary Adjustments
Make the recipe gluten‑free by using a 1‑to‑1 gluten‑free flour blend. For a vegan version, replace butter with plant‑based margarine, use aquafaba in place of eggs, and choose maple syrup instead of honey. To lower sugar, halve the honey and add a splash of stevia‑based liquid sweetener.
Serving Suggestions
Serve the bars alongside a dollop of whipped coconut cream and a sprig of mint for extra elegance. Pair with a chilled glass of sparkling water infused with fresh citrus, or enjoy them as a sweet finish to a light avocado toast brunch.
Storage Info
Leftover Storage
Allow any leftover bars to come to room temperature for a few minutes, then wrap each piece tightly in plastic wrap and place in an airtight container. Store in the freezer for up to three weeks. For short‑term storage, keep the container in the refrigerator for 2‑3 days.
Reheating Instructions
These bars are best enjoyed chilled, but if you prefer a softer texture, microwave an individual bar on medium power for 10‑12 seconds, then let it sit for 20 seconds. Alternatively, let a bar sit at room temperature for 5‑7 minutes before serving; the glaze will soften without melting the crust.
Frequently Asked Questions
Fruity Bliss Frozen Raspberry Lemonade Bars blend bright fruit, buttery crunch, and a creamy glaze into a brunch‑ready delight that’s as beautiful as it is tasty. By following the step‑by‑step guide, you’ll master the perfect texture and flavor balance while enjoying plenty of room for personal twists. Serve them chilled, watch them disappear, and relish the burst of summer in every bite.


