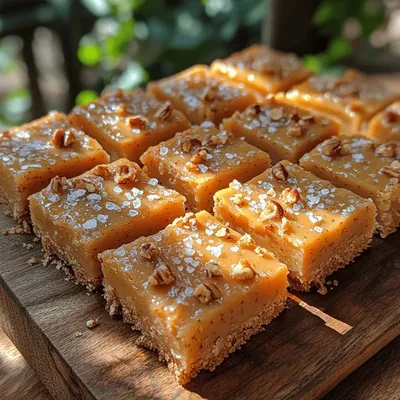
Imagine a golden‑brown square that melts in your mouth, releasing a rich, buttery caramel flavor with just a hint of sea‑salt sparkle. That’s the magic of Irresistible Butterscotch Bliss Bars – a dessert that feels luxurious yet is astonishingly simple to make.
What sets these bars apart is the silky butterscotch sauce that seeps into a tender shortbread crust, creating a perfect balance of buttery crunch and creamy sweetness. A light dusting of toasted pecans adds a satisfying crunch and a subtle nutty depth.
Anyone with a sweet tooth will fall for these bars, from busy parents looking for a quick after‑dinner treat to bakers who love to impress guests at brunch or holiday gatherings. They shine on birthdays, potlucks, or any moment you want a comforting, crowd‑pleasing dessert.
The process is straightforward: prepare a buttery crust, pour a luscious butterscotch filling, bake until set, and finish with a quick toast of nuts. In under an hour you’ll have a tray of bliss ready to slice and serve.
Why You'll Love This Recipe
Butter‑Rich Crust: A simple blend of butter, flour, and brown sugar creates a shortbread base that’s crisp on the edges and melt‑in‑your‑mouth soft in the center.
One‑Pan Simplicity: All components are assembled in a single baking dish, meaning fewer dishes, less cleanup, and more time enjoying the finished bars.
Versatile Sweetness: The butterscotch filling can be dialed up or down with extra vanilla, sea‑salt, or a splash of bourbon for adult‑only twists.
Make‑Ahead Friendly: These bars keep beautifully at room temperature or in the fridge, making them perfect for advance preparation and stress‑free entertaining.
Ingredients
The foundation of these bars is a buttery shortbread crust that provides a sturdy yet tender platform for the luscious butterscotch filling. The filling itself relies on brown sugar, butter, and heavy cream to achieve that glossy caramel sheen, while a pinch of sea‑salt lifts the sweetness. Toasted pecans add texture, and a splash of vanilla rounds out the flavor profile.
Crust
- 1 ½ cups all‑purpose flour
- ¼ cup packed light brown sugar
- ½ cup unsalted butter, melted
- ¼ teaspoon sea‑salt
Butterscotch Filling
- ¾ cup packed dark brown sugar
- ¼ cup unsalted butter, cubed
- ½ cup heavy cream
- 1 teaspoon pure vanilla extract
- ¼ teaspoon sea‑salt (plus extra for topping)
Topping & Extras
- ½ cup pecan halves, coarsely chopped
Each ingredient plays a purpose: the flour and butter create a tender crumb, while the brown sugars contribute deep caramel notes. Heavy cream lends richness without making the filling overly dense, and vanilla adds a fragrant backdrop. The final sprinkle of sea‑salt and toasted pecans brings contrast—both in flavor and texture—ensuring every bite is a layered experience.
Step-by-Step Instructions
Preparing the Crust
Begin by preheating your oven to 350°F (175°C) and greasing a 9×13‑inch baking pan. In a medium bowl combine 1 ½ cups all‑purpose flour with ¼ cup light brown sugar and ¼ teaspoon sea‑salt. Whisk to distribute the dry ingredients evenly. Drizzle in ½ cup melted butter, stirring with a fork until the mixture resembles coarse crumbs. Press the dough firmly into the bottom of the pan, creating an even layer; this will form the buttery foundation for the bars.
Making the Butterscotch Filling
While the crust bakes, melt ¼ cup cubed butter in a saucepan over medium heat. Once the butter foams, add ¾ cup dark brown sugar and stir continuously for 2‑3 minutes; the mixture will turn a deep amber color and emit a sweet, caramel aroma. Carefully pour in ½ cup heavy cream—the mixture will bubble vigorously. Reduce the heat to low and whisk until the sauce is smooth, glossy, and begins to thicken, about 3 minutes. Remove from heat and stir in 1 teaspoon vanilla extract and ¼ teaspoon sea‑salt for balance.
Assembling & Baking
- Combine. Pour the hot butterscotch sauce over the pre‑baked crust, spreading it with a spatula to reach the edges. The sauce will settle into the crumbs, creating a cohesive bar.
- Toast Pecans. Sprinkle the ½ cup chopped pecans evenly across the surface. The nuts will toast in the oven, releasing their oils and adding a crunchy contrast.
- Bake. Return the pan to the oven and bake for 20‑25 minutes, or until the filling is set and the edges of the crust are golden brown. A gentle jiggle in the center is okay; the bars will firm as they cool.
- Cool & Slice. Allow the bars to cool completely in the pan—about 30 minutes—so the filling fully sets. Once cool, lift the entire slab using the pan’s edges, place on a cutting board, and cut into 12 even squares.
Finishing Touch
For an extra pop of flavor, sprinkle a pinch of flaky sea‑salt over each bar just before serving. This tiny burst of brine highlights the buttery sweetness and gives the dessert a sophisticated edge. Serve the bars at room temperature or with a scoop of vanilla ice cream for an indulgent treat.
Tips & Tricks
Perfecting the Recipe
Even Crust Pressure: Use the bottom of a flat glass to press the crust firmly; this prevents gaps where the filling could pool.
Temperature Control: Keep the butter for the crust melted but not hot; overheating can make the crust dry.
Watch the Sauce: When adding cream, stir constantly to avoid scorching; a smooth, glossy sauce is the sign of success.
Cooling Time: Patience is key—let the bars cool fully before cutting to ensure clean, intact squares.
Flavor Enhancements
Add a splash of bourbon or dark rum to the butterscotch sauce for a warm, adult‑friendly note. A teaspoon of espresso powder intensifies the caramel depth without adding coffee flavor. Finish with a drizzle of salted caramel sauce for an extra glossy finish.
Common Mistakes to Avoid
Skipping the butter melt step can leave pockets of dry flour in the crust. Also, over‑baking the filling causes it to become grainy; keep an eye on the edges and remove the pan as soon as the center is just set. Finally, cutting the bars while warm will result in messy, crumbling pieces.
Pro Tips
Use a Light‑Colored Pan: Dark pans can over‑brown the crust; a light aluminum or glass pan gives a more even bake.
Room‑Temp Ingredients: Allow butter and cream to sit at room temperature before mixing; this ensures a smoother sauce.
Toast Pecans Separately: For maximum crunch, toast the nuts in a dry skillet for 3‑4 minutes before sprinkling them on top.
Store in Layers: If you need to stack the bars, place parchment paper between layers to keep them from sticking.
Variations
Ingredient Swaps
Replace pecans with toasted almonds or walnuts for a different nutty profile. For a dairy‑free version, swap butter for coconut oil and use coconut cream instead of heavy cream. Dark chocolate chips mixed into the filling add a decadent surprise.
Dietary Adjustments
Gluten‑free bakers can use a 1:1 gluten‑free flour blend in place of all‑purpose flour. To keep the bars keto‑friendly, substitute the brown sugars with a low‑carb sweetener like erythritol and use almond flour for the crust. Ensure all packaged items are certified gluten‑free when needed.
Serving Suggestions
Serve warm with a scoop of vanilla bean ice cream or a dollop of whipped cream for a classic finish. Pair with fresh berries for acidity, or drizzle a thin layer of salted caramel sauce for extra decadence. These bars also shine when cut into bite‑size pieces for cocktail parties.
Storage Info
Leftover Storage
Once cooled, cut the bars and store them in an airtight container. They keep nicely at room temperature for up to 2 days, thanks to the buttery crust. For longer life, refrigerate the container; the bars will stay fresh for 5‑7 days. If you need to freeze, wrap each bar individually in plastic wrap, then place them in a freezer‑safe bag for up to 3 months.
Reheating Instructions
To enjoy warm bars, preheat the oven to 300°F (150°C) and bake the portion for 8‑10 minutes, or until the filling is soft and the crust regains its buttery aroma. Microwaving for 15‑20 seconds works in a pinch, but the oven method preserves the texture best. Add a fresh drizzle of butterscotch sauce if desired.
Frequently Asked Questions
This Irresistible Butterscotch Bliss Bars recipe delivers a buttery, caramel‑laden experience without demanding advanced pastry skills. By following the detailed steps, using quality ingredients, and applying the provided tips, you’ll achieve perfectly crisp crusts and a luxuriously smooth filling every time. Feel free to experiment with nuts, spices, or even a splash of bourbon to make the bars truly yours. Enjoy the sweet indulgence and share the bliss with friends and family!