Introduction
Desserts that marry the sweet and the salty have a special place in the hearts of many, and few combinations are as irresistible as that of peanut butter and chocolate. Peanut Butter Cup Pretzel Cheesecake Bars have surged in popularity, captivating dessert lovers with their delightful balance of flavors and textures. This indulgent treat combines a creamy cheesecake layer with the crunch of pretzels, interspersed with chunks of peanut butter cups, creating an unforgettable dessert experience.
The allure of these bars lies in their unique construction, where the salty pretzel crust perfectly complements the richness of the cheesecake, while the sweet, gooey peanut butter cups offer delightful bursts of flavor with every bite. This dessert is not only a feast for the taste buds but also a visual delight, making it a perfect centerpiece for gatherings, potlucks, or simply a satisfying indulgence at home.
Understanding the Ingredients
Creating the perfect Peanut Butter Cup Pretzel Cheesecake Bars requires careful attention to the ingredients. Each component plays a crucial role in achieving the ideal flavor profile and texture.
Crushed Pretzels
The foundation of this dessert is its pretzel crust, which introduces a delightful salty crunch that contrasts beautifully with the creamy cheesecake filling. Crushed pretzels serve as the base, providing not just flavor but also a sturdy structure that holds the bars together. The saltiness of the pretzels enhances the sweetness of the cheesecake and peanut butter cups, creating a well-rounded taste.
Cream Cheese
Cream cheese is the star of the cheesecake filling. Its rich, smooth texture is essential for achieving that velvety consistency we associate with classic cheesecake. When blended, cream cheese transforms into a luscious filling that is both dense and creamy. It’s crucial to use full-fat cream cheese for the best results, as it contributes significantly to the richness and overall flavor of the dessert.
Peanut Butter
Peanut butter adds a layer of depth to the cheesecake filling. Its creamy texture and distinct flavor enhance the dessert’s richness while also providing a nutty sweetness that pairs perfectly with chocolate. For the best flavor, opt for a high-quality peanut butter, preferably one that contains just peanuts and salt, to avoid added sugars and oils that can affect the final taste.
Heavy Cream
Heavy cream is essential for creating a light and airy whipped topping that pairs perfectly with the dense cheesecake layer. Whipping heavy cream introduces air, allowing it to expand and create a fluffy texture that balances the richness of the other ingredients. This addition ensures that each bite of the cheesecake bars feels indulgent yet light.
Highlighting Ingredient Quality and Possible Substitutes
When making Peanut Butter Cup Pretzel Cheesecake Bars, the quality of your ingredients can significantly impact the final product. For the pretzels, use fresh, crunchy varieties that will crush easily and hold their integrity in the crust. For the cream cheese, always choose full-fat options, as low-fat alternatives can result in a less creamy texture.
If you’re looking for substitutes, consider using almond or cashew butter in place of peanut butter for a different flavor profile. For a gluten-free version, simply swap out regular pretzels for gluten-free pretzels. While these substitutions can alter the flavor slightly, they can provide delicious alternatives for those with dietary restrictions.
The Perfect Pretzel Crust
The crust is a critical component of the Peanut Butter Cup Pretzel Cheesecake Bars, as it establishes the foundational flavor and texture for the entire dessert. A well-crafted pretzel crust adds both crunch and a hint of saltiness, enhancing the overall dessert experience.
Step-by-Step Breakdown of Making the Pretzel Crust
1. Crush the Pretzels: Start by placing the pretzels in a food processor. Pulse until they reach a fine crumb consistency, similar to that of graham cracker crumbs. If you don’t have a food processor, you can also place the pretzels in a zip-top bag and crush them with a rolling pin.
2. Mix with Butter and Sugar: In a medium bowl, combine the crushed pretzels with melted butter and a touch of sugar. The melted butter acts as a binder, allowing the crumbs to hold together when pressed into the pan. The sugar adds a hint of sweetness that balances the saltiness of the pretzels.
3. Press into the Pan: Once the mixture is well combined, transfer it to a greased 9×13 inch baking pan. Use the back of a measuring cup or your hands to firmly press the crust mixture into an even layer across the bottom of the pan. It’s essential to pack it tightly to ensure the crust holds together after baking.
4. Bake the Crust: Preheat your oven to 350°F (175°C). Bake the pretzel crust for about 8–10 minutes, or until it is slightly golden and fragrant. This step not only helps to solidify the crust but also enhances the flavor through toasting.
5. Cool the Crust: After baking, allow the crust to cool completely before adding the cheesecake layer. This is a crucial step, as adding the cheesecake filling to a hot crust can cause it to melt and lose its structure.
Crafting the Cheesecake Layer
The cheesecake layer is where the magic truly happens. It brings together the creamy, rich flavor of cream cheese with the nutty goodness of peanut butter, creating a delectable filling that will leave your taste buds dancing.
Instructions for Preparing the Cheesecake Layer
1. Soften the Cream Cheese: Before you begin mixing, ensure that your cream cheese is at room temperature. This makes it easier to blend smoothly and prevents lumps in your cheesecake filling.
2. Mix Cream Cheese and Sugar: In a large mixing bowl, beat the softened cream cheese with granulated sugar until it is completely smooth and free of lumps. This step is vital for creating a silky texture.
3. Incorporate Eggs and Vanilla Extract: Add in the eggs, one at a time, mixing well after each addition. This ensures that the eggs are fully incorporated and contribute to the cheesecake’s structure. Follow with a splash of vanilla extract, which enhances the flavor profile of the cheesecake.
4. Add Peanut Butter: Once the mixture is smooth, fold in the peanut butter until evenly distributed. The peanut butter not only adds flavor but also contributes to the creaminess of the filling.
5. Fold in Peanut Butter Cups: Finally, gently fold in chopped peanut butter cups. This step adds delightful pockets of chocolate and peanut butter that will melt in your mouth. Be careful not to overmix, as you want to keep the chunks intact for texture.
By following these steps, you’ll create a smooth and creamy cheesecake layer that pairs perfectly with the pretzel crust. Stay tuned for the continuation of this recipe, where we’ll delve into assembling the bars and topping them for the ultimate dessert experience.
{{image_1}}
Baking the Cheesecake to Perfection
Baking the cheesecake layer for your Peanut Butter Cup Pretzel Cheesecake Bars requires careful attention to ensure a smooth and creamy texture. Start by preheating your oven to 325°F (160°C). This lower temperature is crucial as it prevents the cheesecake from cracking while allowing it to bake evenly.
Guidelines on Baking the Cheesecake Layer
Once your cheesecake batter is prepared and poured over the pretzel crust, it’s time to bake. Place the cheesecake in the oven and bake for about 40 to 45 minutes. Keep in mind that every oven is slightly different, so it’s essential to monitor your cheesecake closely as it approaches the end of the baking time.
How to Tell When It’s Done
To determine if your cheesecake is done, look for the following signs: the edges should be set, and the center should remain slightly jiggly when you gently shake the pan. The texture will continue to firm up as it cools, so don’t worry if the center seems too soft at this stage. Avoid overbaking, as this can lead to a dry cheesecake.
Importance of Cooling and Chilling for the Right Texture
After removing the cheesecake from the oven, allow it to cool in the pan for about 30 minutes at room temperature. This gradual cooling helps prevent cracks from forming. Once it’s cooled, transfer the cheesecake to the refrigerator for at least 4 hours, preferably overnight. Chilling the cheesecake not only allows it to set properly but also enhances its flavor, making every bite even more delightful.
Discussing Chilling Time and Its Effects on Flavor Development
The chilling time is crucial for flavor development in your Peanut Butter Cup Pretzel Cheesecake Bars. As the cheesecake cools, the flavors meld together, resulting in a harmonious blend of the rich cream cheese, peanut butter, and sweet chocolate. Allowing your cheesecake to chill overnight will yield the best results, as the flavors deepen and the texture becomes perfectly creamy.
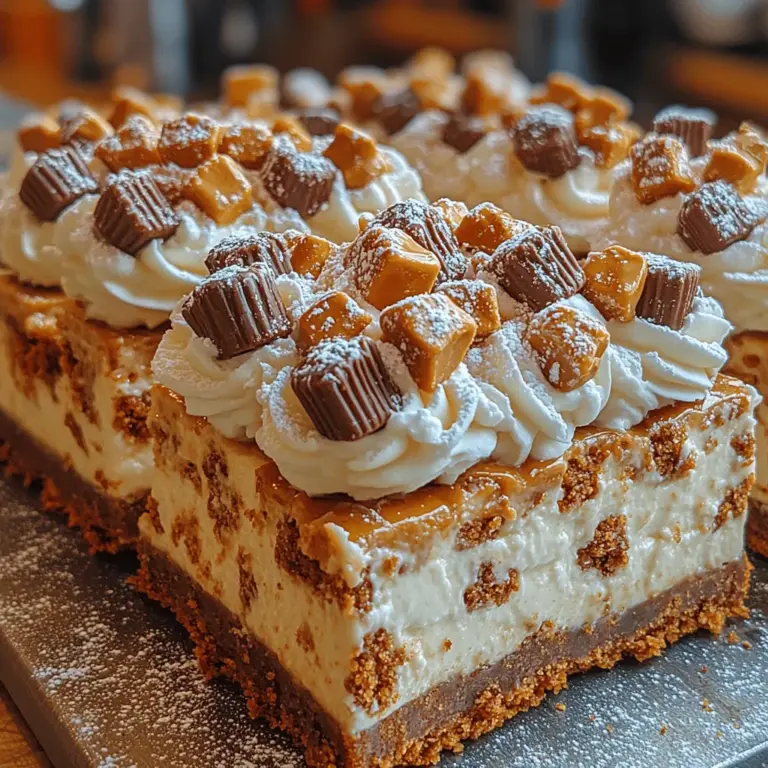
Creating the Decadent Whipped Topping
The whipped topping is the crowning glory of your cheesecake bars, adding a light and airy contrast to the dense cheesecake. It’s essential for both flavor and presentation, enhancing the overall dessert experience.
Step-by-Step Instructions for Making the Whipped Topping
To make the whipped topping, start with a mixing bowl and your choice of heavy cream. For every cup of heavy cream, you will need about 1/4 cup of powdered sugar and 1 tablespoon of peanut butter for flavor. Begin by chilling the mixing bowl and beaters in the freezer for about 10 minutes to help the cream whip faster.
1. Combine Ingredients: In the chilled bowl, add the heavy cream, powdered sugar, and peanut butter.
2. Whip the Cream: Using an electric mixer on medium-high speed, start whipping the cream. As it begins to thicken, increase the speed to high.
3. Achieve Stiff Peaks: Continue whipping until stiff peaks form. This means that when you lift the beaters, the peaks hold their shape without drooping. Be careful not to overwhip, as this can turn the cream into butter.
Balancing Sweetness with Powdered Sugar and Peanut Butter
The sweetness of the whipped topping should complement the flavors of the cheesecake without overpowering them. Adjust the amount of powdered sugar based on your taste preference, keeping in mind that the cheesecake itself is sweet and rich. The peanut butter adds an extra dimension of flavor, making the whipped topping a perfect addition to your bars.
How to Layer the Whipped Topping for Best Presentation
Once your cheesecake has chilled and set, it’s time to layer the whipped topping. Use a spatula to spread the whipped cream evenly over the surface of the cheesecake. For an elegant presentation, you can pipe the whipped topping using a piping bag fitted with a star tip. This technique not only enhances the visual appeal but also adds a touch of sophistication to your dessert.
Assembling and Serving the Dessert
With the cheesecake and whipped topping ready, it’s time to assemble your Peanut Butter Cup Pretzel Cheesecake Bars for serving. This step is essential for ensuring that each bite is as delightful as the last.
Tips for Easy Assembly of the Bars
To make assembly easier, use parchment paper to line the bottom and sides of your baking pan before pouring in the pretzel crust and cheesecake batter. This will aid in the removal of the bars once they are set, allowing for clean edges and a neat presentation.
Best Practices for Cutting and Serving
When it’s time to cut your cheesecake bars, use a sharp knife dipped in warm water. This will help create clean cuts without squishing the layers. After each cut, wipe the knife clean to maintain the neatness of your bars. Aim for squares or rectangles that are easy to handle and serve.
Using Parchment Paper for Easy Removal
As mentioned, lining the pan with parchment paper not only aids in easy removal but also prevents sticking. Once the cheesecake has fully chilled, lift it out of the pan using the edges of the parchment paper. Transfer it to a cutting board for slicing.
Suggestions for Presentation and Garnishing with Chopped Peanut Butter Cups
For an extra touch of decadence, garnish each slice with a sprinkle of chopped peanut butter cups. This not only enhances the visual appeal but also adds an additional layer of flavor that complements your cheesecake bars beautifully. Consider drizzling a bit of chocolate sauce over the top for an indulgent finish.
Serving Suggestions and Pairing Ideas
These Peanut Butter Cup Pretzel Cheesecake Bars are delicious on their own, but they can be elevated further with thoughtful pairing. Serve them alongside a hot cup of coffee for a delightful contrast, or pair them with a glass of cold milk for a nostalgic treat. For a refreshing option, consider serving with a scoop of vanilla ice cream, which will melt slightly over the warm cheesecake for an irresistible combination.
Storing Peanut Butter Cup Pretzel Cheesecake Bars
After enjoying your delicious creation, you may have some bars left over. Proper storage is essential to maintain their freshness and flavor.
Best Practices for Storing Leftovers
To store your Peanut Butter Cup Pretzel Cheesecake Bars, place them in an airtight container in the refrigerator. If you have garnished them, consider doing so just before serving to keep the toppings fresh and appealing.
Discussion on Shelf Life in the Refrigerator
When stored properly, these cheesecake bars will last in the refrigerator for about 5 to 7 days. After that, the texture and flavor may begin to degrade, so it’s best to enjoy them within that timeframe.
Freezing Options for Longer Preservation
If you want to keep your cheesecake bars for a longer time, consider freezing them. Wrap individual slices tightly in plastic wrap and then place them in a freezer-safe bag or container. These bars can be frozen for up to 3 months. When you’re ready to enjoy them, simply thaw them in the refrigerator overnight.
Conclusion
The Peanut Butter Cup Pretzel Cheesecake Bars are a delightful treat that balances the rich, creamy flavors of cheesecake with the salty crunch of pretzels and the sweetness of chocolate and peanut butter. With their perfectly baked cheesecake layer and indulgent whipped topping, these bars are sure to impress at any gathering.
Whether it’s a casual get-together with friends or a special celebration, these dessert bars are a surefire crowd-pleaser. They embody the joy of sharing homemade treats, bringing smiles and satisfaction to those who indulge. So roll up your sleeves and try making these delicious bars—your taste buds will thank you!
